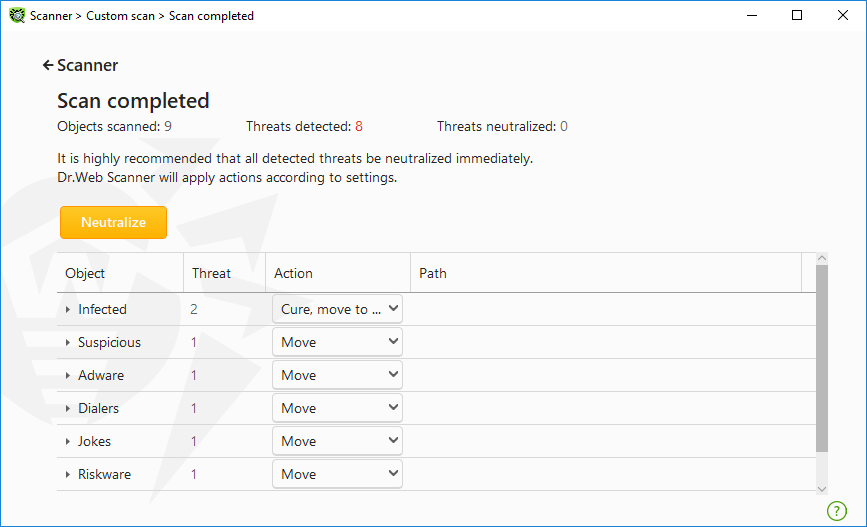
When the scan is completed, Scanner informs you about detected threats and recommends that you neutralize them.
|
If you enable the Neutralize detected threats or Neutralize detected threats and shut down the computer option on the settings page of Dr.Web Scanner to configure After scanning, threats will be neutralized automatically. |

Figure 54. Selecting an action after a scan
The table with scan results contains the following information:
Column |
Description |
|---|---|
Object |
This table column contains the name of a malicious or suspicious object (either a file name if a file is infected, or Boot sector if a boot sector is infected, or Master Boot Record if an MBR of the hard drive is infected). |
Threat |
The names of threats or their modifications as per the internal classification of Doctor Web. For suspicious objects, the following is displayed: indication that the object “is possibly malicious” and the type of a possible threat according to the classification used by the heuristic analyzer. |
Action |
The action recommended for the detected threat according to the Scanner settings. To apply the action for the selected threat, use the drop-down list options. |
Path |
The full paths to the corresponding files. |
Neutralizing all the threats in the table
An action is specified for each threat according to the Scanner settings. To neutralize all the threats by applying actions that are specified in the table, click Neutralize.
To change the action for the threat specified in the table
1.Select an object or a group of objects.
2.In the Action column, select a necessary action from the drop-down list.
3.Click Neutralize. Scanner starts neutralizing all the threats listed in the table.
Neutralizing selected threats
You can also neutralize selected threats separately. To do so:
1.Select an object, several objects (by pressing the CTRL key) or a group of objects.
2.Open a shortcut menu and select a necessary action. Scanner starts neutralizing the selected threat (threats).
Restrictions on neutralizing threats
There are the following limitations:
•For suspicious objects, curing is impossible.
•For objects which are not files (boot sectors) moving and deletion is impossible.
•For files inside archives, containers, or attachments, no actions are possible. The action applies to the whole file.
Scanner report
The detailed report on component operation is stored in the dwscanner.log file that is located in %USERPROFILE%\Doctor Web folder.