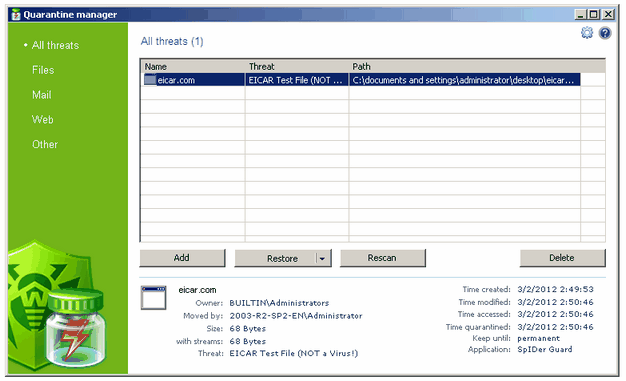
The Quarantine component of Dr.Web serves for isolation of files that are suspected to be malicious. Quarantine also stores backup copies of files processed by Dr.Web.
Folders of Quarantine are created separately on each logical drive where suspicious files are found, that is, if a suspicious object is detected at a portable data carrier accessible for writing, the Quarantine folder is also created on the data carrier. Infected objects are moved to appropriate folders and then the quarantined files located on hard drives are encrypted. The use of separate folders and omission of encryption on portable data carriers prevents possible data loss.
To open this window
Click the SpIDer Agent icon ![]() in the notification area, select Tools, and then select Quarantine Manager.
in the notification area, select Tools, and then select Quarantine Manager.

For details on a certain option, click a corresponding item in the picture.
Item |
Description |
All threats |
Click to show all objects in Quarantine. |
Files |
Click to show files in Quarantine only. |
Click to show email messages in Quarantine only. |
|
Web |
Click to show Web pages in Quarantine only. |
Other |
Click to show objects of other types in Quarantine. |
|
Click to configure Quarantine settings. |
Add |
Select to add an object to Quarantine manually. |
Restore |
Click to restore the selected object to their original location, that is, the folder from which they were moved to Quarantine. To restore the objects to another location, click the arrow on the button, select Restore to, and then select the destination folder. |
Rescan |
Click to rescan the object. Sometimes, updates to Dr.Web virus databases and components allow detecting or curing objects that were previously unknown or incurable. |
Delete |
Click to delete the selected object completely. |
The central table lists the following information on quarantined objects that are available to you:
| • | Name – name of the quarantined object |
| • | Threat – malware class of the object, which is assigned by Dr.Web when the object is quarantined |
| • | Path – full path to the object before it was quarantined |
The bottom pane of the window displays detailed information about the selected objects. You can also display this information in the table.
To configure table view
| 1. | Right-click the header of the table and select Customize columns. |
| 2. | In the opened window, select items which you want to display in the table. You can also do one of the following: |
| • | To view all items, click Check all. |
| • | To hide all items, click Uncheck all. |
| 3. | To change position of a column in the table, select the column in the list and do one of the following: |
| • | To move the column one position to the left, click Move up. |
| • | To move the column one position to the right, click Move down. |
| 4. | After editing, click OK to save the changes or Cancel to cancel them. |
The left pane displays the number of quarantined objects of each type and serves to filter quarantined objects. Click the corresponding link to display objects of interest only.
|
Quarantine displays objects which can be accessed by your user account. To view hidden objects, open the Dr.Web installation folder and run the dwqrui.exe file under a more privileged account, or run Dr.Web under an administrative account. |
By right-clicking an object, you can access the following managing options:
Option |
Description |
Add |
Allows you to add any object to the quarantine using the standard dialog window. |
Restore |
Removes the selected objects from the quarantine and restores them to their original location (the folder where the object had resided before it was moved to the quarantine). |
Restore to |
Removes the selected objects from the quarantine and restores them to selected location. Use this option only when you are sure that the selected objects are not harmful. |
Rescan |
Scans the selected object one more time. |
Delete |
Deletes the selected objects from the quarantine and from the system. |
Submit file to |
Send a file to Doctor Web Virus Laboratory for checking. |
Copy hash to clipboard |
Copy hash of the file, computed using MD5 or SHA256 function, to clipboard. |
To display information or manage several objects simultaneously, select them while holding Shift or CTRL, then right-click anywhere in the table and select a necessary action.
If during rescan file is detected as clean, Quarantine manager will suggest to select one of the following:
| • | Skip – keep this file in the quarantine and continue |
| • | Restore – remove the selected objects from the quarantine and restore them to selected location |
| • | Cancel – interrupt scanning |
If you want to apply selected action to all detected clean files, set the Remember choice flag.
To configure Quarantine
| 1. | Click Settings |
| 2. | In the Quarantine settings window, you can change the following parameters: |
| • | The Set quarantine size section allows you to configure the amount of disk space for Quarantine folder. Move the slider to change upper allowance of Quarantine size, which is counting as percentage of total disk space (for several logical drives, this size counts for every drive which include the Quarantine folder). The 100% value means unlimited Quarantine folder size. |
| • | In the View section, set the Show backup files flag to display backup copies of Quarantine files in the object's table. |
| 3. | After editing, click OK to save the changes or Cancel to cancel them. |