The Parental Control component allows you to manage the access to websites, files, and folders. You can also set time limits on internet and computer usage.
By default, Parental Control is enabled for each account and operates in the No restrictions mode.
|
Depending on settings of your provider, the name of this component can be displayed as Office Control. |
To enable or disable Parental Control
1.Open Dr.Web menu ![]() , then select Security Center.
, then select Security Center.
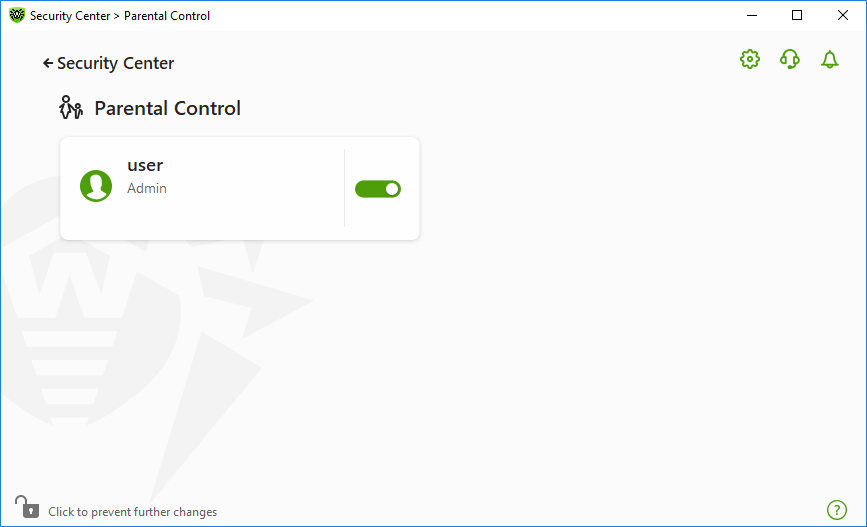
2.In the open window, click Parental Control tile. The Parental Control window opens.

Figure 97. Parental Control
3.Make sure Dr.Web operates in administrator mode (the lock at the bottom of the program window is open ![]() ). Otherwise, click the lock
). Otherwise, click the lock ![]() .
.
4.Enable or disable Parental Control for the required user using a corresponding switcher ![]() .
.
|
New users are listed only after the first login into their account.
Depending on settings of your provider, the switcher |
Configuring Parental Control for a certain user
Before setting restrictions for a user, make sure that this user does not have administrative privileges. Otherwise, the user could change the Parental Control component parameters and disable the access restrictions.
|
The component parameters can be adjusted if the provider enables this option.
Possibility to manage settings for different users can be disabled by your provider. In this case, all specified parameters are applied to all the users of the computer. |
To open Parental Control parameters
1.Make sure Dr.Web operates in administrator mode (the lock at the bottom of the program window is open ![]() ). Otherwise, click the lock
). Otherwise, click the lock ![]() .
.
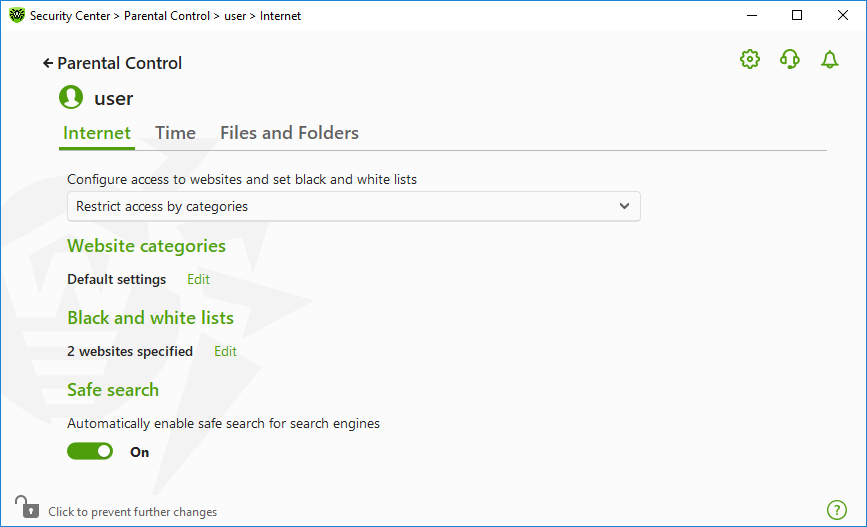
2.In the Parental Control window (see figure Parental Control), click the tile with the user name for whom you want to configure Parental Control. A window with Parental Control parameters opens for the selected user.

Figure 98. Configuring Parental Control
3.Select a necessary tab to configure Parental Control.
•Internet—configure access to internet resources. The tab allows you to restrict users from visiting unwanted websites (pages on violence, gambling, etc.) or allow access only to certain websites. See the Access to internet Resources section.
•Time—configure access to the computer and the internet. The tab allows you to set time limits on use of your computer and the internet on selected time and days of the week. See the Time limits section.
•Files and Folders—configure access the to file system. The tab allows you to restrict access to certain files or folders (on local drives and removable media). See the Access to files and folders section.
|
If the user has a Windows account with administrator rights, you should change its type to Standard User. |
How to change the user’s account type
1.Open the Start menu, then click Control Panel and select User accounts. 2.Select the account which type you would like to change and click Change account type. 3.Select the user’s account type: Limited account. 4.Click Change account type to save the changes. |
![]() On Windows Vista and Windows 7
On Windows Vista and Windows 7
1.Open the Start menu, then click Control Panel and select User accounts. 2.To change the account type, click Manage another account. 3.Select the account which type you would like to change and click Change account type. 4.Select the user’s account type: Standard User. 5.Click Change account type to save the changes. |
1.Open Control Panel and select User Accounts and Family Safety. 2.Click Manage another account button. 3.Select the account which type you would like to change and click Change account type. 4.Select the user’s account type: Standard User. 5.Click Change account type to save the changes. |
1.Point to the lower-right corner of the screen, move the mouse pointer up, click Settings, and then click Change PC settings. 2.Click Accounts, and then click Other accounts. 3.Select the account which type you would like to change and click Change account type. 4.Select the user’s account type: Standard User. 5.Click OK. |
1.Select the Start button, then select Settings. 2.In the open window, select Accounts. 3.On the left side of the window, select Other users. 4.Click the icon of an account which type you would like to change and click Change account type. 5.Select the user account type: Standard User. 6.Click OK. |
1.Select the Start button, then select Settings. 2.In the open window, select Accounts. 3.In the center of the window, select Other users. 4.Click the icon of an account which type you would like to change and click Change account type. 5.Select the user account type: Standard User. 6.Click OK. |
If there is only one account in the system, you cannot change its type to Standard User. For more information, please refer to Microsoft technical support ![]() website.
website.
Receiving notifications
If necessary, you can configure desktop and email notifications on Parental Control actions.