Dr.Web provides on-demand scanning of the file system. You can perform express or full check of the whole file system or scan the critical files and folders only. This function is performed by the Dr.Web Scanner.
It is recommended to periodically scan the system in case SpIDer Guard had not been active for some time. Usually, the express scan is sufficient for this purpose.
Scanning
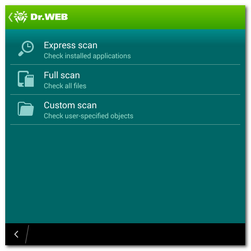
To scan the system, on the main screen tap Scanner and on the opened screen (see Figure 4) do one of the following actions:
| • | To launch only the installed applications check, tap Express scan. |
| • | To scan all the files, tap Full scan. |
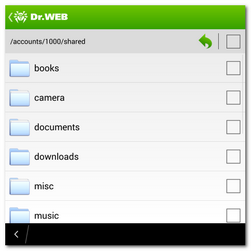
| • | To scan only critical files and folders, tap Custom scan, select the objects in the hierarchical list (see Figure 5) and then tap Scan. While selecting the objects to scan, you can use the options located to the right above the list to select all objects and to go up one folder. |
After the scanning completes, you can review the list of detected threats and choose an action for each malicious object.
Figures 4 and 5. Dr.Web Scanner and custom scan screens
Sending suspicious files to Doctor Web anti-virus laboratory
You can submit suspicious ZIP archives (including *.jar, *.apk and *.bar), presumably containing viruses, or a clean ZIP archive that has been identified as so-called "false positive" to Doctor Web anti-virus laboratory:
| 1. | Tap and hold the file in the hierarchical list (see Figure 5), then tap Send to Laboratory. |
| 2. | In the next screen, enter your email address in order to receive the results of the file analysis. |
| 3. | Select a category for your request: |
| • | Suspicious file, if you think that the file represents a threat. |
| • | False detection or False detection by Origins Tracing, if you think that the file was identified as threat by mistake. |
To make a selection between two categories of false positive, use the name of the threat that the file presumably contains: select the False detection by Origins Tracing category, if the name contains the ".origin" postfix and the False detection one in other cases.
| 4. | Tap Submit. |
|
Only the ZIP archives of not more than 10 MB can be submitted to Doctor Web anti-virus laboratory. |
Dr.Web Scanner settings
To access Dr.Web Scanner settings, on the main screen open the application menu, tap Settings. The following settings are available:
| • | To enable check of files in archives, select the Files in archives check box on the Scanner section. |
|
By default, the archives check is disabled. Enabling the check of archives may influence the system performance and increase the battery power consumption. Anyway, disabling the archives check does not decrease the protection level because SpIDer Guard checks all *.apk and *.bar files regardless of the Files in archives parameter value. |
| • | To enable/disable the detection of adware and riskware (including hacktools and jokes), on the Scanner section, tap More options, then select/clear the Adware and Riskware check boxes. |
Statistics
Dr.Web registers the events related to Dr.Web Scanner operation (check type and results, threats detection). The application actions are displayed on the Actions section of the Statistics screen.

