Dr.Web Security Control Center


|
Dr.Web Security Control Center |
|
|
To manage the anti-virus network and set up the Server, the in-built Dr.Web Security Control Center serves.
Connecting to Dr.Web Server From any computer with network access to the Server, Dr.Web Security Control Center is available at the following address: http://<Server_Address>:9080 or https://<Server_Address>:9081 where <Server_Address> is the IP address or domain name for the computer on which Dr.Web Server is installed.
In the authorization dialog window specify the user name and password of the administrator (by default, administrator name is admin and the password is the same, as was specified during Server installation). If you connect through https protocol (secure SSL connection), the browser requests you to approve the Server certificate. Warnings and indications of distrust to the certificate may display, because the certificate is unknown to your browser. You need to approve the certificate to connect to Dr.Web Security Control Center.
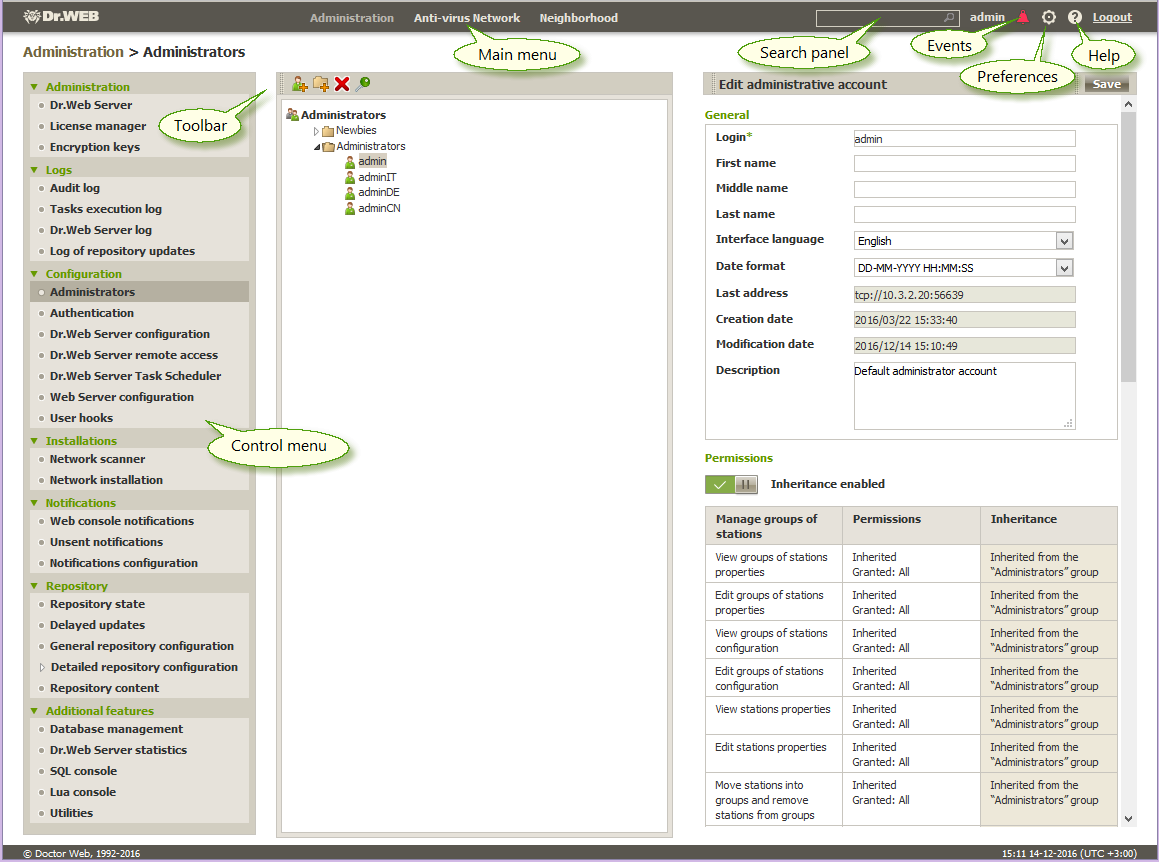
Dr.Web Security Control Center Interface Dr.Web Security Control Center window (see figure below) is divided in main menu header and working area. Working Area The working area is used to perform all the main functions of Dr.Web Security Control Center. It consists of two or three panels depending on the actions which are being performed. Items in the panels are nested from left to right: •the control menu is always located in the left part of the working area, •depending on the selected item, one or two additional panels are displayed. In the latter case, the rightmost panel contains the settings of elements from the central panel. The interface language must be set individually for each administrator account (see p. Managing Administrator Accounts). The main menu consists of the following items: •Administration section, •Anti-virus network section, •Neighborhood section, •the name of the current administrator logged into Dr.Web Security Control Center. Also, the interserver connections menu may be available. •Events section, •Preferences section, •Help section, •Logout to close the current Dr.Web Security Control Center session.
Dr.Web Security Control Center window. Click the main menu option to see the description
If interserver connections with other Dr.Web Servers are configured, the following functions are added to the administrator login on the main menu: •Next to the administrator login, the name of current Dr.Web Server is shown. •Clicking on administrator login opens drop-down list with connected neighbor Servers. If the name for a neighbor is not specified, its identifier is given. On neighbor click, two options are possible: ▫The Control Center of neighbor Server opens if the IP address of the Control Center was specified during connection configuring. ▫If the Control Center address of this neighbor Server is not set, the setting of the Neighbors section opens to specify the IP address. |