Using the Dr.Web Security Control Center you can configure the bandwidth limits for the network traffic during the delivery of updates from Dr.Web Server to Dr.Web Agents on protected workstations in specific time slots.
For more details see Workstation Traffic Limitations.
|
The update bandwidth restrictions are not applied to the installation of new components and also to the updates initiated by the administrator using the |
|
The time is specified in accordance with the time zone of the operating system of the host on which Dr.Web Server is installed. |
Configuring the station update mode
1.Select the Anti-virus network item in the main menu, in the window that opens click the name of a station or group in the hierarchical list. Select Update restrictions in the control menu.
2.From the Update restriction drop-down list, select the type of restriction:
•Update all products—do not restrict the distribution of updates to stations.
•Forbid all updates—forbid the distribution of all updates to stations during the time slots specified in the station update schedule table below.
•Update only bases—forbid the distribution of updates during the time slots specified in the station update schedule table below for all repository products except for:
▫virus databases (10-drwbases),
▫SpIDer Gate databases (10-drwgatedb),
▫Anti-spam databases (10-drwspamdb),
▫virus databases for Android (20-drwandroid11),
▫content filter databases for UNIX (20-drwunix).
The databases will be updated normally, without any changes.
3.Select the Reduce the severity of virus databases aging check box to reduce the severity statues for stations with outdated virus databases. If the check box is selected, the stations with outdated virus databases will be marked in the anti-virus network with the ![]() icon, and in the Status section, the stations will have Low severity. If the check box is cleared, the stations with outdated virus databases will be marked in the anti-virus network with the
icon, and in the Status section, the stations will have Low severity. If the check box is cleared, the stations with outdated virus databases will be marked in the anti-virus network with the ![]() icon (if the
icon (if the ![]() Settings of tree view → Show station states severity option on the toolbar is enabled), and in the Status section, the stations will have Maximal or High severity. Description of a similar setting of the Dr.Web Agent (Virus database relevance period) is given in the Administrator Manual on managing stations under Windows (section Dr.Web Agent → General). The result of applying this setting to the Anti-Virus Network can be seen after reconnection, updating virus databases or other changes in the state of the Dr.Web Agent.
Settings of tree view → Show station states severity option on the toolbar is enabled), and in the Status section, the stations will have Maximal or High severity. Description of a similar setting of the Dr.Web Agent (Virus database relevance period) is given in the Administrator Manual on managing stations under Windows (section Dr.Web Agent → General). The result of applying this setting to the Anti-Virus Network can be seen after reconnection, updating virus databases or other changes in the state of the Dr.Web Agent.
4.In the Interval of revisions relevance field, specify the time interval during which revisions of the products installed on stations will be considered relevant when new revisions appear in the Dr.Web Server repository.
5.Select the Receive the latest updates check box to transmit all component updates to the stations regardless of the limitations specified in the Detailed Repository Configuration section.
If the check box is cleared, the station will receive only the updates for which the revision is marked as Current in the Detailed repository configuration section.
6.Select the Allow revisions downgrade check box to allow downgrading the versions of the anti-virus components on stations from the Dr.Web Server repository according to the distribution settings.
See also Downgrade Product Revision.
7.Select the Limit updates traffic check box to limit the bandwidth for delivering the updates from Dr.Web Server to Dr.Web Agents.
If the check box is cleared, updates for Dr.Web Agents will be delivered without limiting the network traffic bandwidth.
If the check box is selected, specify the following fields:
•In the Default speed field, specify the default value of the maximum bandwidth for update delivery, if no other limitations are set (empty white cells in the schedule table). The default speed value is also applied for periods when data transfer is prohibited but the update process has already started (see below).
•In the Maximal transmission speed (KB/s) field, specify the value of maximum speed for update delivery. In this case, the updates will be delivered within the specified bandwidth of the aggregate network traffic used for updating all Dr.Web Agents.
It is allowed to configure up to five bandwidth limits for update delivery. To add a bandwidth limit, click ![]() . To remove the limit, click
. To remove the limit, click ![]() next to the limit you want to remove.
next to the limit you want to remove.
|
The values of the Default speed and Maximal transmission speed (KB/s) fields must meet the following restrictions: •The value 0 cannot be set. The minimum allowed limit value is 1 KB/s. •An empty value (the field is not set) cancels all limitations on update traffic for the corresponding time period. |
In the schedule table, you can set the data transfer restrictions separately for each 30 minutes of each day of the week.
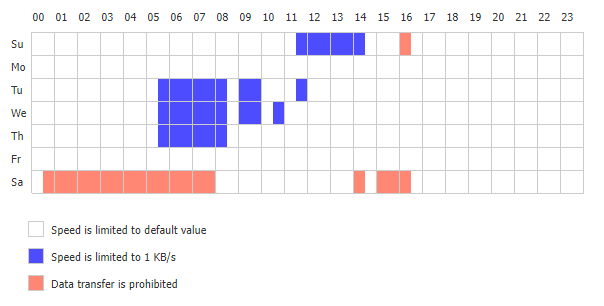
To change the type of data transfer restriction, click the corresponding block in the table. You can also select several time blocks using drag and drop.
The color of the cells changes cyclically according to the legend below the table.
|
The delivery of updates cannot be initiated in the periods marked with the Data transfer is prohibited color. If the update transfer has been already under way at the beginning of this period, it will not be stopped, however the maximum transfer rate will be set to the value indicated in the Default speed field. |
8.After editing is complete, click Save to accept changes.
The following options are also available in the toolbar to manage the parameters of this section:
![]() Reset all parameters to initial values—restore the values that all parameters in this section had before the current edit (most recent saved values).
Reset all parameters to initial values—restore the values that all parameters in this section had before the current edit (most recent saved values).
![]() Reset all parameters to default values—restore the default values of all parameters in this section.
Reset all parameters to default values—restore the default values of all parameters in this section.
![]() Propagate these settings to another object—copy settings from this section to the settings of another station, group or multiple groups and workstations.
Propagate these settings to another object—copy settings from this section to the settings of another station, group or multiple groups and workstations.
![]() Inherit settings from policy or primary group—remove custom settings of a station and set inheritance of settings in this section from a primary group.
Inherit settings from policy or primary group—remove custom settings of a station and set inheritance of settings in this section from a primary group.
![]() Copy settings from policy or primary group and set them as personal—copy settings of this section from a primary group and set them for selected stations. Inheritance is not set and station settings are considered custom.
Copy settings from policy or primary group and set them as personal—copy settings of this section from a primary group and set them for selected stations. Inheritance is not set and station settings are considered custom.
![]() Export settings from this section to the file—save all settings in this section to a file of a special format.
Export settings from this section to the file—save all settings in this section to a file of a special format.
![]() Import settings to this section from the file —replace all settings in this section with settings from a file of a special format.
Import settings to this section from the file —replace all settings in this section with settings from a file of a special format.