You can manage the list of files and folders to be excluded from system anti-virus scans by the SpIDer Guard and Scanner components. You can exclude Dr.Web quarantine folders, working folders of some programs, temporary files (paging file), and so on. Archived files can also be excluded from scanning with Scanner.
To configure the list of excluded files and folders
1.Open Dr.Web menu ![]() , then select Security Center.
, then select Security Center.
2.In the open window, click Exclusions tile.
3.Click the Files and Folders tile.

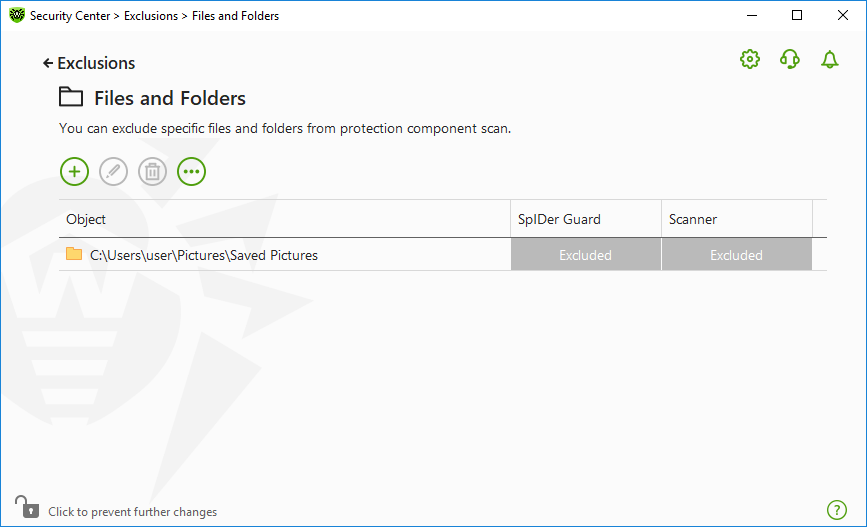
Figure 99. Files and folders exclusion list
The list is empty by default. Add particular files and folders to exclusions or use masks to disable scan of a certain group of files. Any added object can be excluded from the scan of both components or from scan of each component separately.
To add files and folders to the exclusion list
1.To add a file or folder to the exclusion list, do one of the following:
•To add an existing file or folder, click the button. In the open window, click the Browse button to select a file or a folder. You can enter the full path to the file or folder or edit the path in the field before adding it to the list.
![]() example;
example;
▫C:\folder\file.txt—excludes the file.txt file stored in C:\folder. ▫C:\folder\—excludes all files located in C:\folder and its subfolders. |
•To exclude a file with a particular name, enter the name and the extension without path ![]() example;
example;
▫file.txt—excludes all files with the name file and the .txt extension located in all folders. ▫file—excludes all files with the name file located in all folders without regard for the extension. |
•To exclude a group of files or folders, enter the mask of their names. ![]() More about masks
More about masks
A mask denotes the common part of object names, at that: ▫The asterisk (*) character replaces any, possibly empty, sequence of characters. ▫The question mark (?) replaces any character (one). Examples: ▫Report*.doc defines all Microsoft Word documents whose names start with the word “Report” (ReportFebruary.doc, Report121209.doc, etc.) ▫*.exe defines all executable files; i.e., that have the EXE extension (setup.exe, iTunes.exe, etc.) ▫photo????09.jpg defines all JPG images which names start with the word “photo”, end with “09” and contain exact number of 4 other characters in the middle (photo121209.jpg, photoJoe09.jpg, or photo----09.jpg, etc.) ▫file*—excludes all files located in all folders without regard for the extension with the names starting with file. ▫file.*—excludes all files with the name file and with all extensions located in all folders. ▫C:\folder\**—excludes all files located in C:\folder and its subfolders on any nesting level. ▫C:\folder\*—excludes all files stored in C:\folder. The files stored within subfolders will be scanned. ▫C:\folder\*.txt—excludes all *.txt files stored in C:\folder. The *.txt files stored within subfolders will be scanned. ▫C:\folder\*\*.txt—excludes all *.txt files stored in the first nesting level subfolders of C:\folder. ▫C:\folder\**\*.txt—excludes all *.txt files stored in subfolders of any nesting level within C:\folder. The files stored in C:\folder itself, including *.txt files, will be still scanned. |
•To exclude particular files in archives from being scanned by Scanner, enter the mask of the path or the extension. Use forward slash (/) character ![]() example;
example;
▫C:\folder.zip/file.*—excludes all files with the name file located in the archive C:\folder.zip. ▫*/file.txt—excludes all files file.txt located in all archives. |
2.In the window of adding a file or a folder, specify the components that should not scan the selected object.
3.Click OK. The file or folder will appear on the list.
4.To add other files and folders, repeat steps 1–3.
Managing listed objects
The following management elements are available to work with objects in the table:
•The button—adding an object to the exclusion list.
•The button—editing the selected object in the exclusion list.
•The button—removing the selected object from the exclusion list.
You can also access these settings by right-clicking the selected object or several selected objects.
•Click to access the following options:
▫Export—allows you to save the created list of exclusions to be used on another computer where Dr.Web is installed.
▫Import—allows you to use the list of exclusions created on another computer.
▫Clear all—allows you to remove all objects from the list of exclusions.