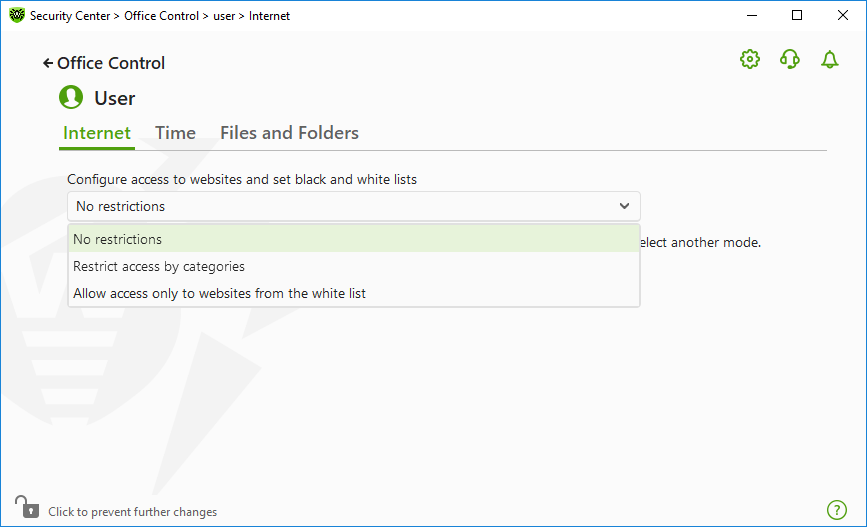
On the Internet tab, you can restrict users from visiting unwanted websites (pages on violence, gambling, etc.) or allow access only to certain websites. By default, the No restrictions mode is set for all users. The following modes are also available:
•Restrict access by categories
•Allow access only to websites from the white list
|
Encrypted traffic is not monitored. Resources in browsers can be blocked only by host name. |

Figure 91. Selecting the mode of Office Control
Restrict access by categories mode
In the mode, you can specify website categories to block. The same website can be assigned to several different categories. In this case, Office Control blocks access to the site if it belongs to at least one of the categories included in restrictions list.
In this mode you can also add websites to block or allow access to the resources regardless of other restrictions. To do so, use black and white lists.
|
Before restricting access to categories, clear the browser cache. |
To allow or block access to websites of a certain category
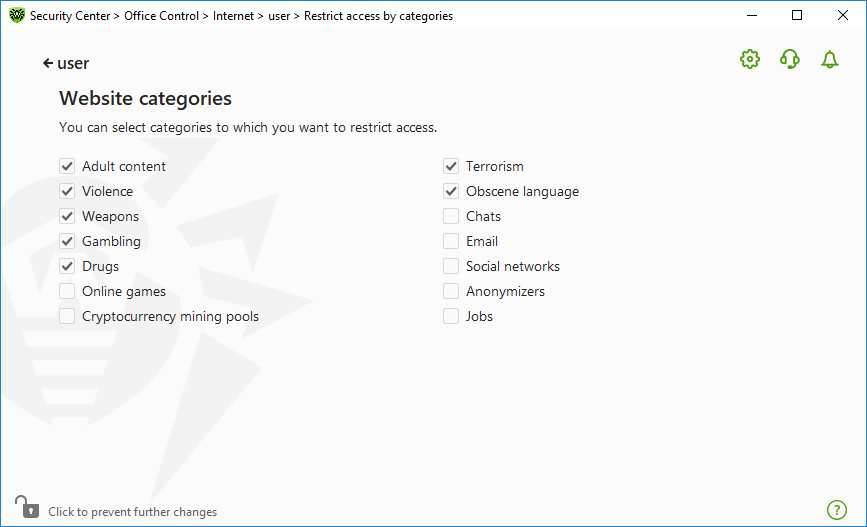
1.In the Website categories group, click Edit. The window with blocking categories parameters opens.

Figure 92. Categories of websites to block
2.Select or clear the check box to allow or block access to websites of a certain category.
Categories of internet resources
Category |
Description |
|---|---|
Adult content |
Websites that contain pornographic or erotic materials, dating sites, etc. |
Violence |
Websites that encourage violence or contain materials about various fatal accidents, etc. |
Weapons |
Websites that describe weapons and explosives or provide information on their manufacturing. |
Gambling |
Websites that provide access to online games of chance, casinos, auctions, including sites for placing bets, etc. |
Drugs |
Websites that promote use, production or distribution of drugs, etc. |
Online games |
Websites that provide access to games using the permanent internet connection. |
Terrorism |
Websites that contain aggressive and propaganda materials or terroristic attacks descriptions, etc. |
Obscene language |
Websites that contain the obscene language (in titles, articles, etc.). |
Chats |
Websites that offer a real-time transmission of text messages. |
Websites that offer the possibility of free registration of a web mailbox. |
|
Social networks |
Different social networks: general, professional, corporate, interest-based; thematic dating sites. |
Anonymizers |
Websites that allow the user to hide personal information and providing the access to the blocked web resources. |
Cryptocurrency mining pools |
Websites that provide an access to common services for cryptocurrencies mining. |
Jobs |
Websites that are used to post job vacancies and search for jobs. |
Allow access only to websites from the white list mode
In this mode, the access to all websites except the listed in white list is blocked.
|
If selecting the Allow access only to websites from the white list mode, such websites can be displayed incorrectly. Banners and other site elements integrated with external resources will not be displayed. |
You can set black and white lists of websites access to which is allowed or blocked regardless of other Office Control parameters.
|
Before adding a site to black or white lists, clear the browser cache if the site has been previously opened in this browser. |
Configuring black and white lists of Office Control
1.In the Black and white lists group, click Edit. The window with black and white list settings opens.

Figure 93. Configuring black and white lists of Office Control
2.Add the object to the White list field to allow access to the website. Add the object to the Black list field to prevent access to the website. You can enter a mask, a domain or a URL address of an object to white or black lists ![]() Details
Details
•To add certain websites to the list, enter the mask of their names. Letters, numbers, colon (:), forward slash (/), hyphen (-), question mark (?) and asterisk (*) characters are allowed. Masks will be added in the mask://... format. A mask denotes the common part of object names, at that: ▫The asterisk (*) character replaces any, possibly empty, sequence of characters. ▫The question mark (?) replaces any one character. Examples: ▫mask://*.com/—will allow processing of all the domain .com websites; ▫mask://mail—will allow processing of all websites whose names contain the “mail” word; ▫mask://ma?l.com/—will allow processing of all websites whose names contain “ma” and “l.com” with any character between them.
•To add a website within a particular domain to the list, enter the domain name with or without a dot (.) character at the end of the address. Letters, numbers and forward slash (/) are allowed. Examples: ▫example.com—will allow processing of example.com and its subdomains *example.com; ▫example.—will allow processing of subdomains *example.com but not example.com itself; ▫.com—will allow processing of all subdomains of the domain .com, such as example.com or www.test.com. •To add websites whose URL contains a certain text, enter this text in the input field. Letters, numbers, forward slash (/) and hyphen (-) characters are allowed. Examples: ▫example.com/test—will allow processing of such webpages as example.com/test11, template.example.com/test22, and so on; ▫example—will allow processing of such webpages as example.com, example.test.com, test.com/example, test.example222.com, and so on. |
Your input may be unified. For example: the https://www.example.com address will be transformed into example.com.
|
Masks, domains and addresses are not case-sensitive. This means that example.com and ExAMple.COM will be processed the same way. |
3.Click to add the website to the list.
4.To remove an address from the list, select the corresponding item and click .
5.Click to access the following options:
•Edit—allows you to edit the selected address on the list.
•Export—allows you to save the created list of addresses to be used on another computer where Dr.Web is installed.
•Import—allows you to use the list of addresses created on another computer.
•Clear all—allows you to remove all objects from the list of addresses.
6.To add other websites, repeat steps 2 and 3.
Safe search
The Safe search option affects results of search engines. This option allows you to exclude unwanted webpages from search results by using the search engine tools.
To activate the Safe search function, set the switcher ![]() in On state.
in On state.