The installation of Dr.Web Server for Windows OS is described below.
Before installing Dr.Web Server, please consider the following:
|
The distribution file and other files requested during the program installation should reside on local drives of the computer on which the Dr.Web Server software is installed; these files should be made available to the LOCALSYSTEM user.
Dr.Web Server should be installed by a user with administrator privileges on the computer. |
|
After Dr.Web Server is installed it is necessary to update all Dr.Web Enterprise Security Suite components (see the Administrator Manual, section Manual Update of Dr.Web Server Repository). |
The figure below shows the flowchart of Dr.Web Server installation procedure. The steps in the flowchart correspond to the detailed description of the installation procedure shown below.
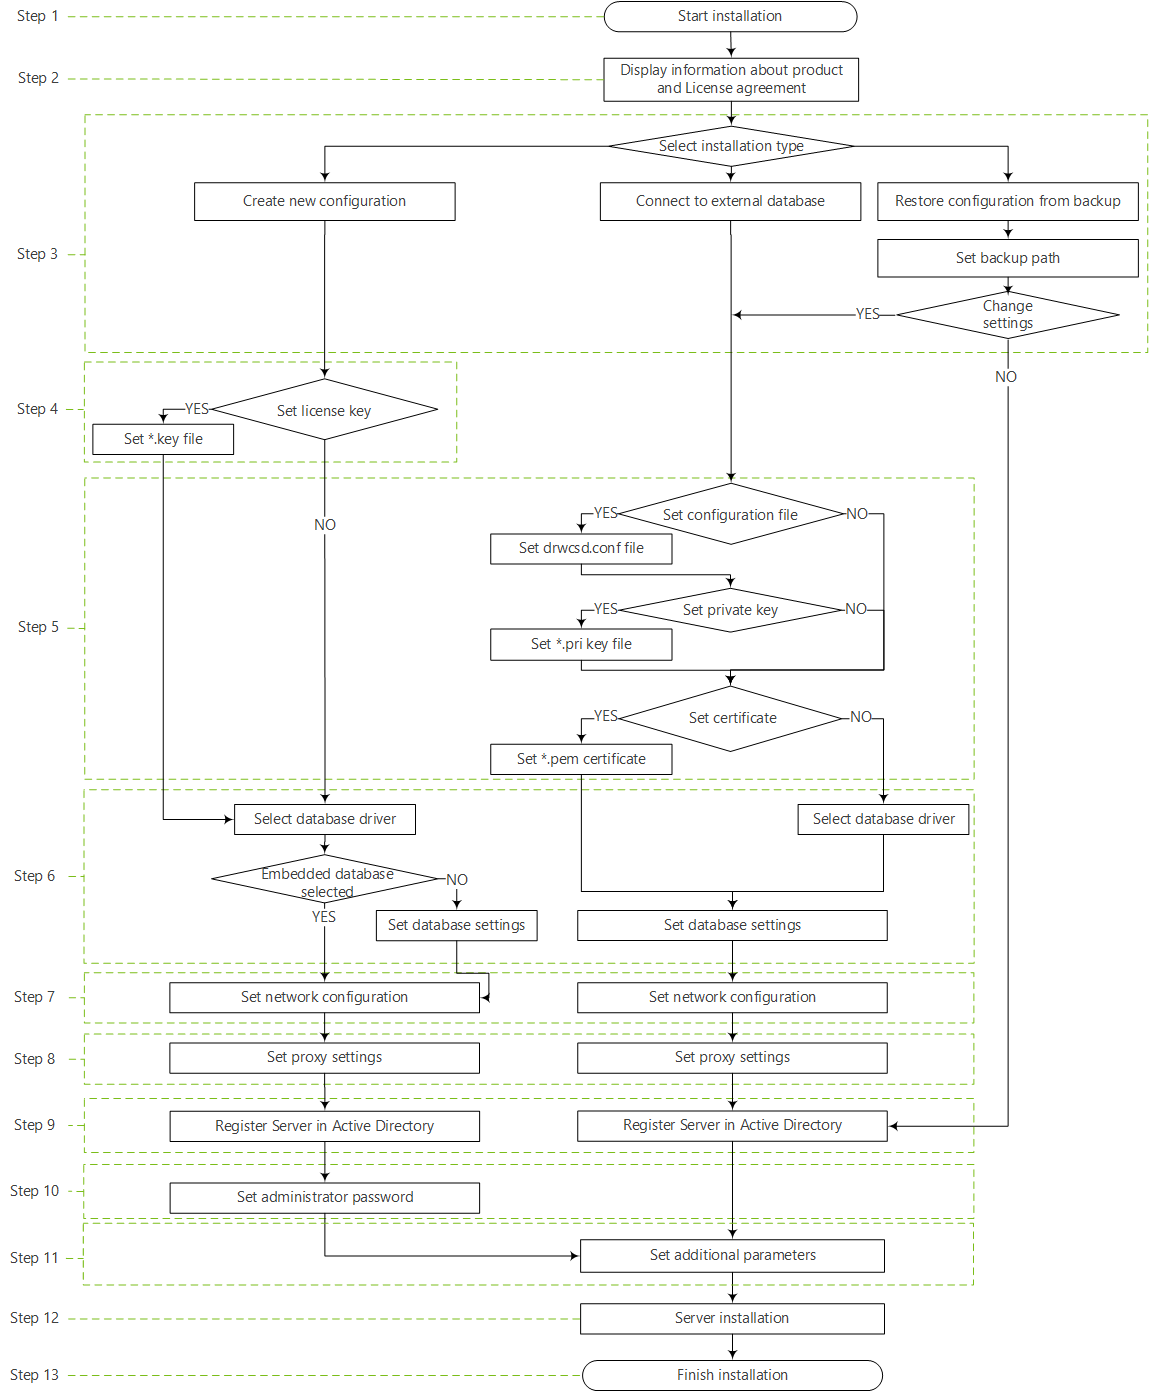
Dr.Web Server installation procedure flowchart (click any item in the flowchart to see its description)
Installing Dr.Web Server on a computer running Windows OS
1.Run the distribution file. The installation will check if a newer version of the distribution is available on GUS.
|
By default, the installer uses the language of the operating system. If necessary, you can change the installation language at any step by selecting the appropriate option in the right upper part of the installer window. |
2.A window will open with information about the product being installed and a link to the text of the license agreement. After reading the agreement click Next to continue the installation.
3.In the next window, select the type of Dr.Web Server installation.
•Create new configuration—this installation type creates a new Dr.Web Server configuration with default settings. The settings from the previous Dr.Web Server installations can't be used. This installation type initializes a new database regardless of the database type selected during setup. Click Next. Proceed to step 4.
•Connect to external database—this type of installation means connecting to the existing external database of Dr.Web Server. This installation type upgrades the, existing external database from the previous Dr.Web Server installation. Click Next. Proceed to step 5.
|
In case an external database is to be used, it is necessary to create the database first and set the appropriate driver (see Appendix A. The Description of the DBMS Settings. The Parameters of the DBMS Driver). |
•Restore configuration from backup—all Dr.Web Server configurations will be restored from the specified backup of the previous Dr.Web Server installation. Specify the path to the backup.
For this type of installation, the database dump from the backup will be imported and upgraded.
▫If necessary, you can manually change the settings from the backup. To do this, click Change settings—settings in steps 5-8 will be available.
▫If you do not need to change the settings manually, click Next. The configuration from the backup is used automatically. The private encryption key and certificate are extracted from the backup. To continue the installation, a configuration file is required. If the Wizard is unable to restore any settings from the backup, a window with these settings is displayed for you to specify them manually. Proceed to step 9.
4.If you selected the Create new configuration option in step 3, specify the licensing settings in the License window:
•Select the Configure licensing later option to continue the Dr.Web Server installation without a license key.
Note: a license is required to organize the anti-virus protection. License keys should be added after the Dr.Web Server installation using the License Manager, or the necessary number of licenses should be donated via interserver connection from a neighboring Dr.Web Server.
•Select the Specify the path to the license key option to specify the Dr.Web Agent license key file during the Dr.Web Server installation.
You can use demo key files for evaluation purposes. Click Request the demo key to go to the Doctor Web official website and obtain demo license key files (see Demo key file).
5.If you selected the Connect to external database option in step 3, or if you selected Change settings when restoring a configuration from the backup, you can specify the following settings in the Dr.Web Server configuration window:
•Dr.Web Server configuration file—path to the configuration file with Dr.Web Server settings from the previous installation (drwcsd.conf).
•Dr.Web Server private encryption key—path to the Dr.Web Server private encryption key file from the previous installation. This will automatically generate the public key file (the public key content will be the same as the previous public key) and the certificate if it is not specified in the field below (at each generation from the same private key you will get a new certificate).
•If you use an existing private encryption key, you can specify the previously used certificate file in the Use existing Dr.Web Server certificate field. This will allow already installed Dr.Web Agents to connect to the new Dr.Web Server, because clients connected to Dr.Web Server are bound to a specific certificate (a new certificate is generated from the same private key each time). Otherwise, after installation, it is necessary to copy a new certificate to all workstations where Dr.Web Agents were previously installed.
|
Certificate must match the private encryption key. |
If no files are specified, a new configuration is created with default settings, new encryption keys, and a certificate.
6.The Database driver window allows you to set the parameters of the used database depending on the installation type:
•If you selected the Create new configuration option in step 3, select the driver type to use:
▫Select the SQLite (embedded database) option to use the features built into Dr.Web Server. No additional parameters are required.
▫The other options imply usage an external DB. To configure access to a DB you should specify appropriate parameters. DBMS parameters are described in the Appendices (see Appendix A. The Description of the DBMS Settings. The Parameters of the DBMS Driver).
•If in step 3 you selected the Connect to external database option or set the Change settings flag for the Connect to external database option:
▫If you specified the path to Dr.Web Server configuration file in step 5, the data will be taken from it automatically. Edit the data if necessary.
▫If you did not specify the path to the Dr.Web Server configuration file in step 5, select the external database driver and specify the settings of the external database to which Dr.Web Server should connect.
7.If at step 3 you have selected the Create new configuration or the Connect to external database option or set the Change settings flag for the Connect to external database option, the Network Configuration window will open. You can set a network protocol for the Dr.Web Server (only one network protocol can be specified; additional protocols can be configured later).
▫In the Interface and Port fields, specify the appropriate values for accessing the Dr.Web Server.
|
By default, port 2193 is used.
Addresses should be specified in the network address format described in the Appendices, section. Appendix D. The Specification of Network Addresses. |
▫Set the Enable Dr.Web Server detection service if you want the Dr.Web Server to respond to broadcast and multicast requests from other Dr.Web Servers using the IP address and service name specified in the corresponding fields below.
8.If at step 3 you have selected the Create new configuration or the Connect to external database option or set the Change settings flag for Connect to external database option, the Proxy server window will open where you can set the proxy server parameters when connecting to Dr.Web Server.
To connect to the Dr.Web Server through the proxy server, set the Use proxy server flag.
|
The Use proxy server flag will be available only if the Dr.Web Server installation folder does not contain configuration files from the previous installation. |
Specify the following parameters to connect to the proxy server:
•Proxy server address—the address of the proxy server (required field),
•User name, Password—user name and the password for accessing the proxy server, if the proxy server supports authorized connection.
•In the Authorization method drop-down list, select the necessary method of authorization at proxy server, if the proxy server supports authorized connection.
9.If the computer where Dr.Web Server is installed is included in the Active Directory domain, the next window will prompt you to register the Dr.Web Server in the Active Directory domain. During registration in the Active Directory domain, the SRV record corresponding to the Dr.Web Server is created on the DNS server. Later, clients will be able to access Dr.Web Server using this SRV record.
Specify the following registration parameters:
•Set the Register Dr.Web Server in the Active Directory flag.
•In the Domain field, specify the name of the Active Directory domain to which Dr.Web Server should be registered. If the domain is not specified, the domain in which the computer running Dr.Web Server is registered is used.
•In the User name and Password fields, enter the credentials of the Active Directory domain administrator.
•DNS server addresses are retrieved automatically and their number depends on the specified DNS servers.
10.If you selected the Create new configuration option in step 3, the Administrator password window opens. Specify the password for the anti-virus network administrator who is created by default with the admin login and a full set of permissions to manage the anti-virus network. For the other types of installation, the password of the main administrator from the database of the previous Dr.Web Server installation is used.
11.The next window informs you that the Wizard is ready to install Dr.Web Server. If necessary, you can configure additional installation parameters. To do this, click Additional parameters at the bottom of the window and specify the following settings:
•On the General tab:
▫In the Dr.Web Security Control Center interface language drop-down list, select the default interface language for Dr.Web Security Control Center.
▫In the Dr.Web Agent interface language drop-down list, select the default interface language for Dr.Web Agent and anti-virus package components to be installed on stations.
▫Set the Share Dr.Web Agent installation folder flag to change the usage mode and the name of the Dr.Web Agent shared installation folder (by default, the name of the hidden shared resource is selected).
|
See detailed information about the shared resource in the Appendices, F6. Share.conf Configuration File. |
▫Set the Launch Dr.Web Server after installation is complete flag to start Dr.Web Server automatically after the installation.
▫Set the Update repository after installation is complete flag to automatically update the Dr.Web Server repository after the installation is completed.
▫Set the Restrict access to Dr.Web Server flag to restrict local access to Dr.Web Server. Dr.Web Agent Installers, Dr.Web Agents and other Servers (for existing anti-virus network created with Dr.Web Enterprise Security Suite) will not be able to access Dr.Web Server. You can change these settings later in the Dr.Web Security Control Center menu Administration → Dr.Web Server configuration → Modules tab.
▫Set the Send statistics to Doctor Web company flag to send statistics about events related to threats to the Doctor Web company.
•On the Path tab:
▫In the Dr.Web Server installation folder field, specify the folder in which Dr.Web Server will be installed. To change the default folder, click Browse and select the required folder.
▫In the Dr.Web Server backup folder field, specify the folder where Dr.Web Server critical data should be backed up according to the Dr.Web Server schedule tasks. To change the default folder, click Browse and select the required folder.
•On the Log tab, you can specify the settings for logging Dr.Web Server operation.
After the additional parameter setup is finished, click OK to apply these changes or Cancel if no changes were made or to cancel all specified changes.
12.Click Install to begin the installation. No further actions are required by the installer.
13.When the installation is completed, click Finish.
As a rule, Dr.Web Server can be managed using Dr.Web Security Control Center, which acts as an interface to Dr.Web Server.
The installation wizard creates the Dr.Web Server folder in the Programs main menu of Windows OS. The folder contains the following items for configuring and managing Dr.Web Server:
•The Server control folder contains the commands for starting, restarting and shutting down Dr.Web Server, as well as the commands for setting up the logging parameters and other Dr.Web Server commands described in detail in Appendix G3. Dr.Web Server.
•The Web interface item opens Dr.Web Security Control Center and connects to the Dr.Web Server installed on this computer (at https://localhost:9081).
•The Documentation item opens the administrator documentation in HTML format.
The structure of the Dr.Web Server installation folder is described in the Administrator Manual, section Dr.Web Server.