Below is described the installation of Enterprise Server for Windows OS. The set and the order of steps may somewhat differ depending on the distribution file version.
Before installing, please, consider the following:
|
If Terminal Services are installed on Windows OS, you should install the software through the Add or Remove Programs Wizard only.
The distribution file and other files requested during the program installation should reside on local drives of the computer on which the Server software is installed; these files should be made accessible for the LocalSystem user.
Enterprise Server should be installed by a user with the administrator’s rights to the computer. |
|
After Enterprise Server is installed it is necessary to update all Dr.Web ESS components (see p. Manual Updating of the Dr.Web ESS Components).
In case an external database is to be used it is necessary to create the database first and set the ODBC driver (see Appendix B. The Description of the DBMS Settings. The Parameters of the DBMS Driver). |
Figure below illustrates the flowchart of Enterprise Server installation procedure. Steps in the flowchart correspond with the detailed description of the installation procedure shown below.
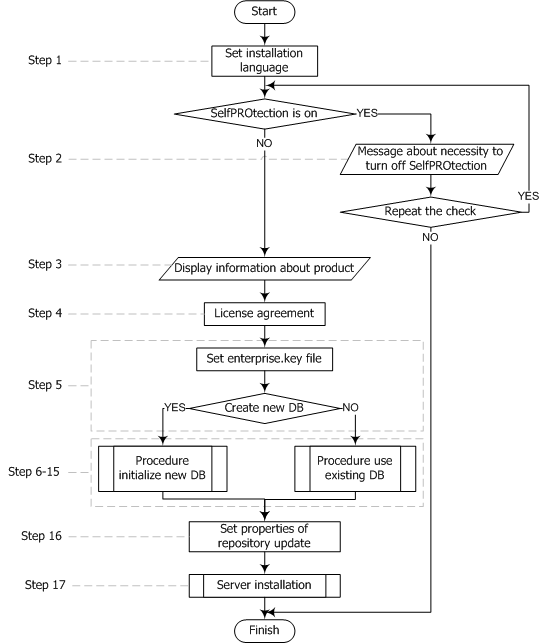
The Dr.Web Enterprise Server installation procedure flowchart (click any block in the flowchart to see its description)
The flowchart contains three built-in procedures. The Server installation procedure (step 17) does not require user intervention (see description below) and is performed directly by the installer.
Figures below illustrate installation procedure flowcharts for cases when a new DB is created and when an existing DB is used.
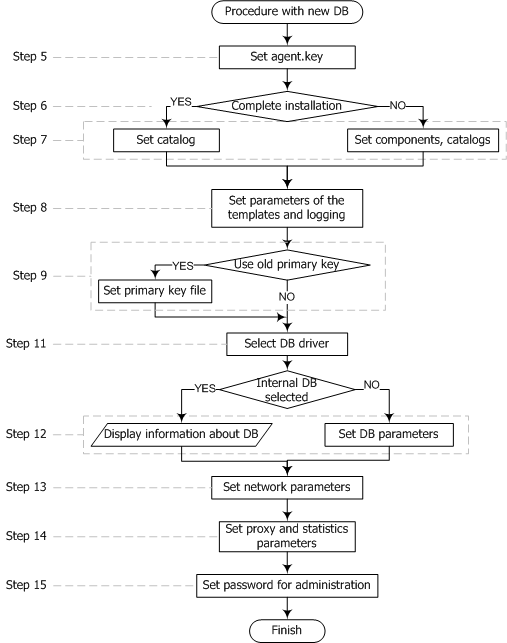
Flowchart of the installation procedure when a new DB is created (click any block in the flowchart to see its description)
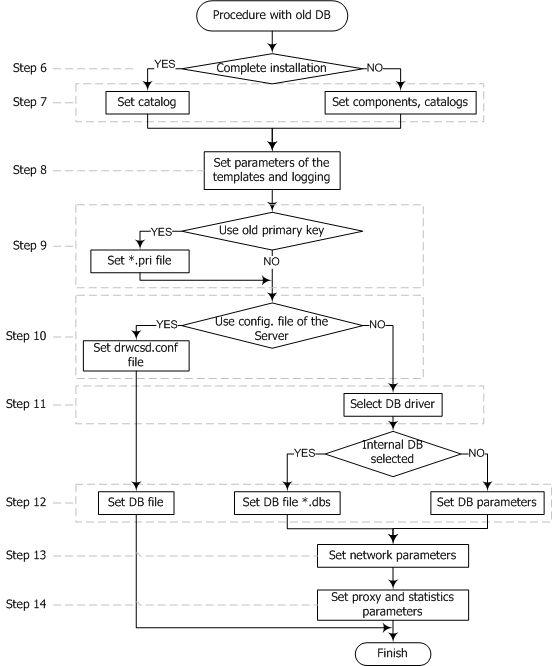
Flowchart of the installation procedure when an existing DB is used (click any block in the flowchart to see its description)
To install the Dr.Web Enterprise Server on a computer operated by Windows OS:
1.Run the distribution file. A window for choosing the language of the Installation Wizard will be opened. Select the necessary language and click Next.
2.If Dr.Web Enterprise Security Suite software is installed on you computer and Dr.Web SelfPROtect is enabled, the wizard prompts you to disable it. Disable SelfPROtect and click ОК to continue installation, or click Cancel to cancel Server installation.
3.A window with information about the program to be installed will be opened. Click Next.
4.A window with the text of the license agreement will be opened. You should read and accept the agreement. To continue the installation, in the bottom part of the window select I accept the terms of the license agreement and click Next.
5.A window for selection of license key files will be opened.
In the upper field click Browse, and then specify the enterprise.key license key file for the Server in the standard Windows OS window.
At first installation of the Server, in the This installation will field select Initialize new database. In the Initialize database with this Dr.Web Enterprise Agent license key field, specify the key file for the workstation software (agent.key).
If you want to keep the Server database of the previous installation, select Use existing database. You will be able to specify the database file later (see step 10).
For evaluation purposes a demo key file can be used. Click the Demo keys button to go to the official web site of Doctor Web company and receive the license key file (see Demo key files).
Click Next.
6.A window for selecting the installation type will be opened. If you select Complete, all components of Dr.Web Enterprise Security Suite will be installed. If you select Custom, you will be able to specify the necessary components. After selecting the installation type click Next.
|
If you are going to use the ODBC for Oracle as an external database, select the Custom option and disable the installation of Oracle client (in the Database support - Oracle database driver section) in the opened window. Otherwise, Oracle DB functioning will fail because of the libraries conflict. |
7.If you selected Complete in the previous step, a window for changing the default installation folder (C:\Program Files\DrWeb Enterprise Server) will be opened. If necessary, click Change and specify the installation folder. Click Next.
If you selected Custom in the previous step, a window for selecting the necessary components will be opened. You can change the installation parameters for each component in the context menu: install component locally, for network access or do not install component. If you wish to change the installation folder for a component, click Change and specify the installation folder. Click Next.
8.Next you can choose the language of the notification templates, set the Agent shared installation folder (hidden by default) and set up installation logging.
If you want the Server to be started automatically after the installation, set the Start service during setup flag.
If you want to add an exception for your operating system firewall (except the Windows 2000 OS) to allow Server operations, select Add Server ports and interfaces to firewall exceptions.
9.In the next window at first installation of the Server just click Next. Encryption keys will be automatically generated during setup.
If you are installing the Server for an existing anti-virus network, select the Use existing Dr.Web Enterprise Server encryption keys flag and specify the file with the private key. A file with the public key will be created (contents of the public key will match the contents of the previous public key). Otherwise after the installation it will be necessary to copy the new encryption key to all workstations, on which Enterprise Agents have been previously installed.
10.Next, if you have selected the existing database at step 5, a window where you can specify a prearranged Server configuration file instead of that created by the installation program will appear.
In the next series of windows the main settings stored in the Server configuration file should be specified (see Appendix G1. Dr.Web Enterprise Server Configuration File).
11.The database configuration dialog window allows you to adjust the parameters of the used database. These parameters depend on the database type specified in step 5 and the availability of the Server configuration file specified in step 10.
If you are creating a new DB or if the configuration file for an existing database was not specified, select the driver which should be used. The IntDB database driver option means that internal facilities of the Enterprise Server should be used. Other options imply usage of an external DB. Parameters of DBMS are described in the appendices (see Appendix B. The Description of the DBMS Settings. The Parameters of the DBMS Driver).
Click Next.
12.If you selected IntDB database driver for creating a new DB in the previous step, the information for creating a new DB will be displayed.
If you selected one of the options with an external DBMS, it will be necessary to specify access parameters for the DB.
If you are using the Server DB from the previous installation and in the previous step you specify the Server configuration file or select IntDB database driver, it is necessary to specify the DB file. For this, click Browse. Set the Verify database during setup flag, to verify database integrity when installing the Server.
13.Next, if you selected creation of a new DB in step 5 or did not specify the Server configuration file from previous installation in step 10 (for an existing DB), a window dedicated to network configuration will be opened. You can set up a network protocol for the Server (it is allowed to create only one protocol, more protocols can be set up later).
Specify appropriate Server access values in the Interface and Port fields. By default, interface is set to 0.0.0.0 which means that the Server can be accessed via any interface.
|
By default port 2193 is using, but also port 2371 is supported for compatibility with anti-virus software older versions. |
To limit the local access to the Server, set the Restricted access to Dr.Web Enterprise server flag. The Installer, Agents and other Servers (in case of an existing anti-virus network built with Dr.Web Enterprise Security Suite) will not be able to access the Server. You can change these settings later through Dr.Web Control Center menu Administration → Dr.Web Enterprise Server → Modules.
Set the Server detection service flag, if you want the Server to answer broadcast and multicast queries of other Servers.
To specify the default network settings click Standard in the bottom of the window. In case you want to limit the Server operation only to the internal network interface – 127.0.0.1, click Restricted. With such settings the Server can be administrated only from the Dr.Web Control Center launched on the same computer, and communicate only with the Agent launched on the same computer. In future after the Server settings have been checked out you will be able to change them.
14.If you selected creation of a new DB in step 4 or did not specify the Server configuration file from previous installation in step 9 (for an existing DB), the next window will contain a request to send statistics on virus events to Doctor Web company. To do this, set the Allow sending statistics flag and edit corresponding fields. Default values for the Server is stat.drweb.com, for URL – \update. You can also specify the Username and Password for identification of the sent statistics (contact the Dr.Web Technical Support Service for information about your user name and password). In the Send every <...> field specify an interval in minutes for sending the statistics. Server and Send every are the only obligatory fields.
If you are using a proxy server, you can also specify its parameters in this window. To do this, set the Use proxy flag and specify its address, user name and password.
The Use proxy flag will be available only if the Server installation folder does not contain configuration files from the previous installation.
15.If you selected creation of a new DB in step 4 in the next window specify an administrator password.
|
It is not allowed to use national characters in administrator password. |
Click Next.
16.Next you are recommended to instruct updating of the repository during the installation. To do this, set the Update repository flag. Click Next.
17.Click Install. Further actions of the installation program do not require user intervention.
18.Once the installation is complete, click Finish.
|
Having installed the Enterprise Server, for correct forming of links during Agent installation packages creating, edit the value of the ServerName parameter in the webmin.conf configuration file located at the etc subfolder of the Enterprise Server installation folder. Uncomment this parameter and instead of www.example.com specify the IP address or DNS name of the computer on which Enterprise Server is installed and the port number in the following format: ServerName <Server_Address>:<port_number> Save the changes and restart the Enterprise Server.
If you use a cluster system of Enterprise Servers and if you use custom port at the Enterprise Server, edit corresponding parameters in the download.conf configuration file, located in the etc subfolder of the Enterprise Server installation folder (see also Appendix G3. Download.conf Configuration File). |
As a rule, Enterprise Server is administrated by means of the Dr.Web Control Center.
Elements to facilitate adjusting and managing the Server are placed in the main Windows OS menu by the installation wizard.
On the Start → Programs menu, the installation wizard creates a Dr.Web Enterprise Server folder which contains the following items:
◆The Server control folder in its turn contains the commands to start, restart and shut down the Server, as well as the commands to set up the logging parameters and other Server commands described in detail in Appendix H5. Dr.Web Enterprise Server.
◆Web interface item opens the Dr.Web Control Center and connects to the Server installed at this computer (at the http://localhost:9080).
◆Documentation item opens administrator documentation in HTML format.
The installation folder of the Dr.Web Enterprise Server (for Windows OS) has the following structure:
◆bin — here reside executable files of Enterprise Server;
◆etc — contains the files where main program settings are stored, and licence keys of the Server (enterprise.key) and the Agent (agent.key);
◆Installer — contains a program initializing the installation of Enterprise Agent on a computer and the public encryption key file (drwcsd.pub);
◆update–db –– contains scripts necessary to update the structure of Server databases;
◆var — contains the following subfolders:
•backup –– is meant for storing the backups of DBs and other critical data,
•extensions –– stores user scripts meant to automate the performance of certain tasks, all scripts are disabled by default,
•repository – it is a so-called the updates folder; here updates of the virus databases, files of the anti-virus packages and files of the program components can be found. It contains subfolders for the program components software which include subfolders for their versions depending on the OS. The folder should be accessible for writing to the LocalSystem user (under Windows OS) or the drwcs user (under UNIX OS) under which the Server is launched,
•templates — contains a set of reports templates.
◆webmin — contains administrator’s Dr.Web Control Center: documents, icons, modules.
|
The content of the updates catalog \var\repository is automatically downloaded from the updates server through HTTP protocol according to the Server schedule, or the anti-virus network administrator can manually place the updates to the catalog. |