To use several Servers in an anti-virus network, you should set up connections between these Servers.
It is advisable to make a plan and to draw the structure of the anti-virus network first. All data flows, connections of the "peer to peer" and "parent-child" types should be indicated. Then, each Server included into the network connections with any "neighboring" Servers ("neighbors" have at least one dataflow between them) should be set up. After that, for each Server included into the network, you should set up connections with "neighboring" Servers ("neighbors" have at least one data flow between them).
Example: Configure a connection between Parent and Child Dr.Web Enterprise Servers
|
Values of fields, marked by the * sign, must be obligatory specified. |
1.Make sure that both Enterprise Servers operate normally.
2.Make sure that each of the Enterprise Servers uses different keys enterprise.key.
3.Connect to each of the Enterprise Servers by means of the Dr.Web Control Center and give them “meaningful” names, as it will help prevent mistakes while connecting and administering the Enterprise Servers. You can change the names through the Dr.Web Control Center menu: Administration → Configure Dr.Web Enterprise Server on the General tab in the Name entry field. In this example we name the Parent Server MAIN, and the Child Server - AUXILIARY.
4.On both Enterprise Servers, enable the server protocol. To do this, on the Dr.Web Control Center Administration menu, select Configure Dr.Web Enterprise Server. On the Modules tab, set the Dr.Web Enterprise Server flag (see p. Setting the Dr.Web Enterprise Server Configuration).
|
If the server protocol is disabled, the message about enabling this protocol will be shown and the link to the corresponding section of the Dr.Web Control Center will be given during creation of new connection. |
5.Restart both Enterprise Servers.
6.Connect the Dr.Web Control Center to the Child Server (AUXILIARY) and add the Parent Server (MAIN) to the list of neighbor Servers of the Child Server. To do this, select Neighborhood item in the main menu. A window with the hierarchical list of the anti-virus network Servers "neighboring" with the given Server will be opened. To add a Server to the list click the Create neighbor ![]() in the toolbar.
in the toolbar.
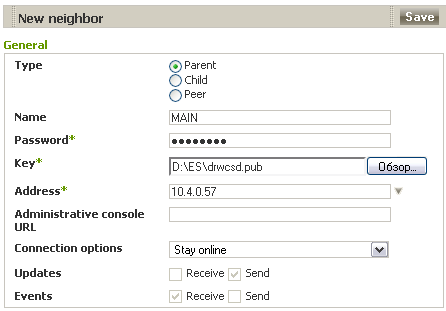
A window to describe the connection between the current Server and the new Server will be opened (see Figure below). Select the Parent type. In the Name entry field type the name of the Parent Server (MAIN), in the Password field type an arbitrary password to access the Parent Server. To the right of the Key field click View and specify the drwcsd.pub key of the Parent Server. In the Address field type the address of the Parent Server.
You can browse the list of Servers, available in the network. To do this:
a)Click the arrow on the right of the Address field.
b)In the opened window, specify networks in the following format: with a hyphen (for example, 10.4.0.1-10.4.0.10), separated by a comma with a whitespace (for example, 10.4.0.1-10.4.0.10, 10.4.0.35-10.4.0.90), with a network prefix (for example, 10.4.0.0/24).
c)Click ![]() to browse the network for available Servers.
to browse the network for available Servers.
d)Select the Server in the list of available Servers. Its address will be set to the Address field to create connection.
In the Administrative console web address field specify the address of a start web page for the Dr.Web Control Center of the main Server (see p. Dr.Web Control Center).
Flags in Updates and Events sections are set according to parent-child type of connection and can not be changed:
◆main Server sends updates to child Servers;
◆main Server receives information about events from child Servers.
Click Save.
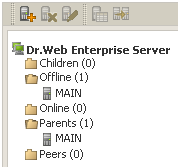
As a result, the Parent Server (MAIN) will be included to the Parents and Offline folders (see Figure below).
Connect the Dr.Web Control Center to the Parent Server (MAIN) and add the Child Server (AUXILIARY) to the list of neighbor Servers of the Parent Server. To do this, select Neighborhood item in the main menu. A window with the hierarchical list of the anti-virus network Servers "neighboring" with the given Server will be opened. To add a Server to the list click the Create neighbor ![]() in the toolbar.
in the toolbar.
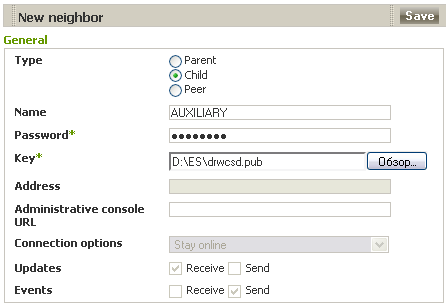
In the opened window (see Figure below) select the Child type. In the Name entry field type the name of the Child Server (AUXILIARY), in the Password field type the same password as at step 6. To the right of the Key field click View and specify the drwcsd.pub key of the Child Server.
In the Administrative console web address field specify the address of a start web page for the Dr.Web Control Center of the child Server (see p. Dr.Web Control Center).
Flags in Updates and Events sections are set according to parent-child type of connection and can not be changed:
◆child Server receives updates from main Server;
◆child Server send information about events to main Server.
Click Save.
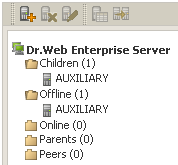
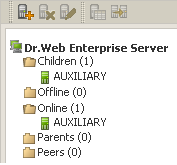
As a result, the Child Server (AUXILIARY) will be included to the Children and Offline folders (see Figure below).
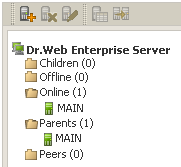
Wait until the connection between the Servers has been established (usually it takes not more than a minute). Click f5 from time to time to check this. After the Servers have been connected, the Child Server (AUXILIARY) will move from the Offline folder to the Online folder (see Figure below).
Connect the Dr.Web Control Center to the Child Server (AUXILIARY) to make sure that the Parent Server (MAIN) is connected to the Child Server (AUXILIARY) (see Figure below).
|
You may not connect two Servers installed with the same license key (enterprise.key).
You may not connect several Servers with the same pare of parameters: password and the drwcsd.pub public key. |
|
For peer to peer connections between Servers, it is recommended to set Server address in the settings for one of them only. It will not take effect on the Servers interconnection, but allows to avoid messages like Link with the same key id is already activated in the Servers log files. |
Connection between two Dr.Web Enterprise Servers can be failed because of:
◆Network problems.
◆Wrong address of the main Server was set during connection setup.
◆Wrong drwcsd.pub encryption public key at one of connecting Servers.
◆Wrong access password at one of connecting Servers (passwords on connecting Servers are not matched).
◆The same enterprise.key license key on both Servers.
◆License key (enterprise.key) of connecting child Server matches with the license key of the child Server already connected to the main Server.
|
While creating connections between Servers, you can specify update restrictions for the connected Servers. To do this, click |
