Dr.Web for Linux graphical interface is a windowed application which functions in the graphical desktop environment and is used for management of Dr.Web for Linux operation.
Main functions
The graphical interface of Dr.Web for Linux allows users to
1.View status of Dr.Web for Linux operation, including status of virus databases and period of license validity
2.Start and stop SpIDer Guard
3.Start and stop SpIDer Gate
4.Start file scanning on demand in one of the following modes:
oExpress scan to check system files and most critical system objects
oFull scan to check all accessible files in the file system
oCustom scan to check only those files and directories that are specified by the user, or special objects (disk boot sectors, active processes)
You can specify files to be scanned either by selecting files and directories before scanning starts or by dragging and dropping them from the file manager window to the Main page (see below) or Scan page of the Dr.Web for Linux window.
5.View all threats detected on the computer by Dr.Web for Linux during current operation in graphics mode, including neutralized and skipped threats and quarantined objects.
6.View quarantined objects, delete, or restore them
7.Configure parameters of Dr.Web for Linux operation including:
oActions to be automatically applied to detected threats (depending on their type) by Scanner and SpIDer Guard
oList of files and directories that should not be scanned by Scanner or checked by SpIDer Guard
oBlack and white lists of websites, used by SpIDer Gate, and parameters for scanning files downloaded from the Internet
oSchedule of scanning tasks including the period and type of performed scanning, and list of objects that are to be scanned
oOperation mode (status of connection to the central protection server)
oEnable or disable Dr.Web Cloud usage
8.License management (performed via License Manager).
|
To enable correct operation, ensure that all service components are running before Dr.Web for Linux is started; otherwise, it shuts down immediately after the startup having displayed the corresponding warning message. Under normal operation, all necessary components are started automatically and do not require user intervention. |
The appearance of the Dr.Web for Linux Main page is shown in the picture below.
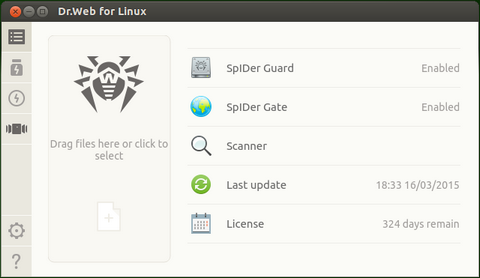
Picture 24. Main window of the Dr.Web for Linux
The left pane of the window displays navigation buttons which allow to perform the following actions.
Button |
Description |
|---|---|
Continuously enabled |
|
|
Opens the Main page where you can •Enable or disable SpIDer Guard •Enable or disable SpIDer Gate •Start scanning of file system objects (files, boot records) and running processes •View the virus database status and update the databases, if necessary •Start License Manager to view the current license status and register a new license, if necessary |
|
Opens the Quarantine page where you can view quarantined files, delete them, or restore. |
|
Opens the window containing Dr.Web for Linux settings, including •Scanner settings •SpIDer Guard settings •SpIDer Gate settings •Run scannings by a schedule Moreover, in this window you can configure settings of central protection mode. |
|
Provides access to Doctor Web reference materials and resources •Product information •User manual •Official forum •Technical support •Personal user's webpage My Dr.Web. All links open webpages in the browser installed in your system. |
Visible depending on certain conditions |
|
|
Opens the page with the list of incomplete scanning tasks. The button is visible on the pane only if at least one scanning task is in progress. |
|
Opens the page with results of complete scanning tasks. The button changes its color depending on the scanning results 1) Green – all scanning tasks completed successfully; all detected threats, if any, are neutralized 2) Red – some of the detected threats are not neutralized 3) Yellow – at least one of the scanning tasks failed The button is visible on the pane only if at least one scanning task was started. |
|
Opens the page where threats detected by Scanner or SpIDer Guard are listed. Available only if at least one threat has been detected. |
|
Available only if the page for starting scanning is opened and active. When another page is opened or scanning is started, the page will be closed and the button will be hidden automatically. |
|
Available only if the page with SpIDer Guard settings is opened and active. When another page is opened, the page with SpIDer Guard settings will be closed and the button will be hidden automatically. |
|
Available only if the page with SpIDer Gate settings is opened and active. When another page is opened, the page with SpIDer Gate settings will be closed and the button will be hidden automatically. |
|
Available only if the page with update settings is opened and active. When another page is opened, the page with update settings will be closed and the button will be hidden automatically. |
|
Available only if the License Manager page is opened and active. When another page is opened, the License Manager page will be closed and the button will be hidden automatically. |
Main Page
On the Main page you can find the target pane where you can drag and drop files and directories to be scanned. The pane is marked with the Drag files here or click to select label. After objects are dragged and dropped from the file manager to the Main page, their scanning starts (if the Scanner is already scanning other objects, the new scanning task is queued).
On this page, the following buttons are available:
•SpIDer Guard – displays the current status of SpIDer Guard. Click this button to open the SpIDer Guard page with the component settings where you can start or stop SpIDer Guard as well as view statistics on its operation.
•SpIDer Gate – displays the current state of SpIDer Gate, which monitors access to web resources. If clicked, opens the control page, where you can start or stop SpIDer Gate and view statistics on its operation.
•Scanner – allows to open the page where you can start scanning of files and other file system objects (for example, boot records).
•Last update – displays the current status of virus databases. Click this button to open the page with update status where you can start an updating process, if required.
•License – displays status of the current license. Click this button to open the License Manager page where you can find more detailed information on the current license as well as purchase and register a new license if required.