•Advanced File Scanning Settings
On the Scanner tab, you can configure actions to be applied by Dr.Web Security Space to threats detected by Scanner while scanning files on demand or on schedule.

Figure 38. Scanner settings
Select actions from the drop-down lists to be applied by Dr.Web Security Space to objects upon detection of any threat of the corresponding type.
If a threat is detected in a file inside a container (an archive, an email message and so on), the container is quarantined and not deleted. |
By selecting the check box Automatically apply actions to threats, you instruct Dr.Web Security Space to apply the specified action to a threat once it is detected by Scanner while scanning on demand or on schedule (you will be informed about threat neutralization, and threat details will be available on the threat list). If the check box is cleared, the threat detected by Scanner will be added to the list of detected threats and you will need to manually select the action to be applied to the object containing the threat.
Click Advanced to open the window with advanced file scanning settings.
Notes:
•You can exclude files and directories from scanning by Scanner on the Exclusions tab.
•Reactions to threat detection defined for Scanner, including automatically applying actions, do not have an effect on the behavior of the SpIDer Guard monitor. Its reactions are specified on the corresponding page.
To change the reaction of Scanner to threats and access advanced settings, the application must operate with elevated permissions (refer to the Managing Application Privileges section).
A possibility to configure Scanner when Dr.Web Security Space is controlled by a centralized protection server can be blocked if this is not allowed by the server. |
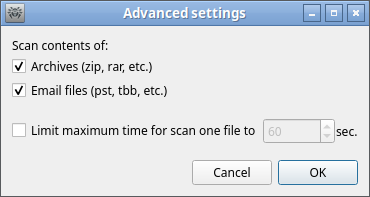
Advanced File Scanning Settings
You can configure the following parameters of Scanner on the window with advanced scanning settings:
•Enable and disable the scanning of containers:
▫archives;
▫mail files.
•Set a time limit for scanning one file.

Figure 39. Advanced file scanning settings
If the check boxes that enable the scanning of containers are not selected, the container files are scanned by Scanner anyway, but enclosed files are excluded from scanning. |
To save the changes and close the window, click OK. To discard the changes and close the window, click Cancel.