Information received throughout the analysis is recorded in a report.
To open report
•If you have not left the analysis page, the report opens automatically after the analysis.
•If you have left the page before the analysis is complete, on the main page, in the History section, select the necessary file.
Report structure
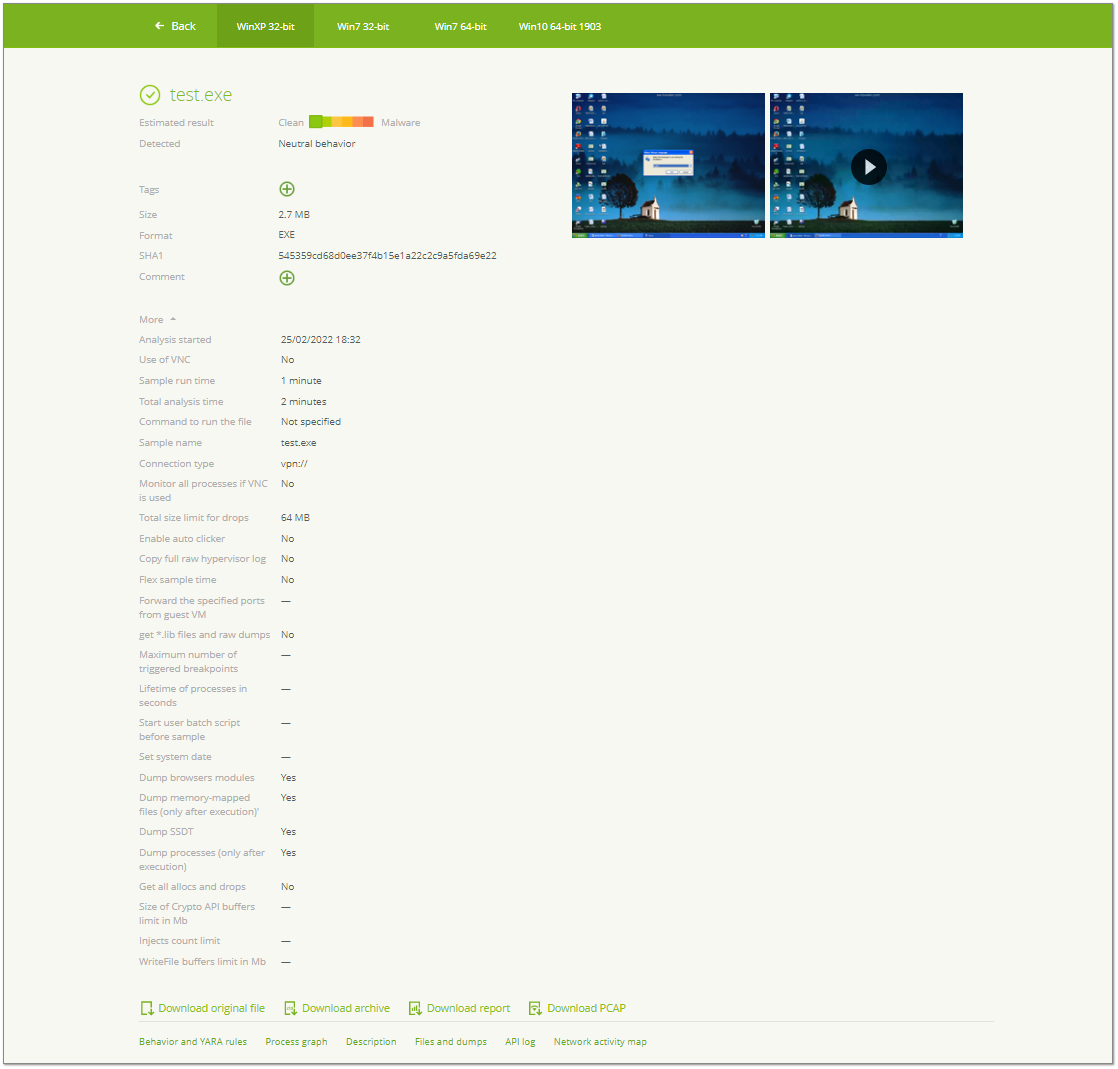
Figure 16. Report structure
The report is divided in two blocks: general information and main section.
Item |
Description |
||||||
|---|---|---|---|---|---|---|---|
Estimated result |
Overall result of the file’s maliciousness.
|
||||||
Detected |
Brief information on the file behavior and detected threats. |
||||||
Tags |
Tags added by a user or by the YARA rule. |
||||||
Size |
File size. |
||||||
Format |
File format. |
||||||
SHA1 |
File hash. |
||||||
More |
|||||||
Analysis started |
Date and time the analysis started. It is counted from the moment the file was launched on a virtual machine. |
||||||
Use of VNC |
Use of VNC client during the analysis (yes/no). |
||||||
Sample run time |
Sample run time that was specified in the analysis additional settings. |
||||||
Total analysis time |
Total duration of file analysis. |
||||||
Command to run the file |
Command that was specified in the additional settings to run the file you analyze. |
||||||
Сopy full raw hypervisor log |
Сopy full raw hypervisor log (yes/no). |
||||||
Flex sample time |
Use flex sample time (yes/no). |
||||||
Forward the specified ports from guest VM |
Forward the specified ports from guest VM. Example: 2343, 4353:tcp. |
||||||
Get *.lib files and raw dumps |
Get *.lib files and raw dumps (yes/no). |
||||||
Enable auto clicker |
Enable auto clicker (yes/no). |
||||||
Maximum number of triggered breakpoints |
Set the maximum number of triggered breakpoints |
||||||
Lifetime of processes in seconds |
Set lifetime of processes. Example: notepad.exe,35,winword.exe,20. |
||||||
Start user batch script before sample |
Start user batch script before sample. |
||||||
Set system date |
Set system date on VM on which analysis is performed. Example: 17.03.2022. |
||||||
Dump browsers modules |
Dump browsers modules (yes/no). |
||||||
Dump memory-mapped files (only after execution) |
Dump memory-mapped files (only after execution) (yes/no). |
||||||
Dump SSDT |
Dump SSDT (yes/no). |
||||||
Dump processes (only after execution) |
Dump processes (yes/no). |
||||||
Get all allocs and drops |
Get all allocs and drops (yes/no). |
||||||
Size of Crypto API buffers limit in Mb |
Set size of Crypto API buffers limit in Mb. Example: 512. |
||||||
Injects count limit |
Injects count limit. Example: 100. |
||||||
WriteFile buffers limit in Mb |
Set WriteFile buffers limit in Mb. Example: 256. |
||||||
Maximum size of collectable drops |
Set maximum size of collectable drops |
||||||
On the right of the general information, you can see a screenshot and a video report about the file’s behavior after it was run in a guest operating system.
The main body contains the following sections which are present depending on the sample format.
Section |
Android packages (optional) |
Other formats |
|---|---|---|
+ |
– |
|
+ |
+ |
|
– |
+ |
|
+ |
+ |
|
+ |
+ |
|
+ |
– |
|
+ |
API log only |
|
+ |
+ |
By default, the report is kept for 20 minutes. You can change the report retention period in the vxcube_web_keep_reports variable.
If the report is removed, only the section with general information will be available on its page.
To regenerate the report, start the analysis of the original file again. To do so, on the report page, click Analyze.
Report actions
On the report page, the download buttons are available that allow you to:
![]() Download original file.
Download original file.
![]() Download archive of the report in ZIP format. The archive password is vxcube.
Download archive of the report in ZIP format. The archive password is vxcube.
![]() Download report in HTML and PDF format.
Download report in HTML and PDF format.
![]() Download PCAP file.
Download PCAP file.
To download report
1.At the top of the page, select platform.
2.Click ![]() Download report. The Report parameters window appears.
Download report. The Report parameters window appears.
3.Select a report format: HTML or PDF.
4.Select sections you need to be included in the report. The API log and Intents sections may contain thousands of records, you can select some records by their danger degree.
5.Click Download report.
|
The Intents table appears in reports for Android packages only. |
To add a tag
1.In the Tag section of the report click ![]() .
.
2.Enter a tag’s name using letters, digits or underscore.
3.Click ![]() .
.