To upload a file for analysis
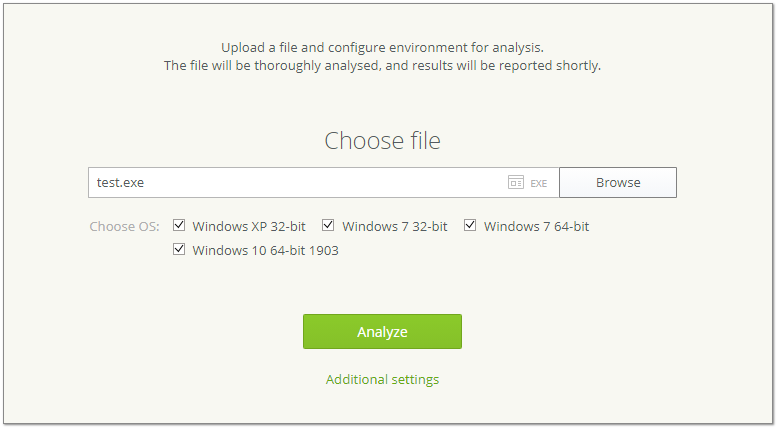
1.Click Browse button or browse field. In the opened window, select a file you want to analyze.
You can also drag and drop a file into the field.
Dr.Web vxCube identify the uploaded file format by its content automatically.
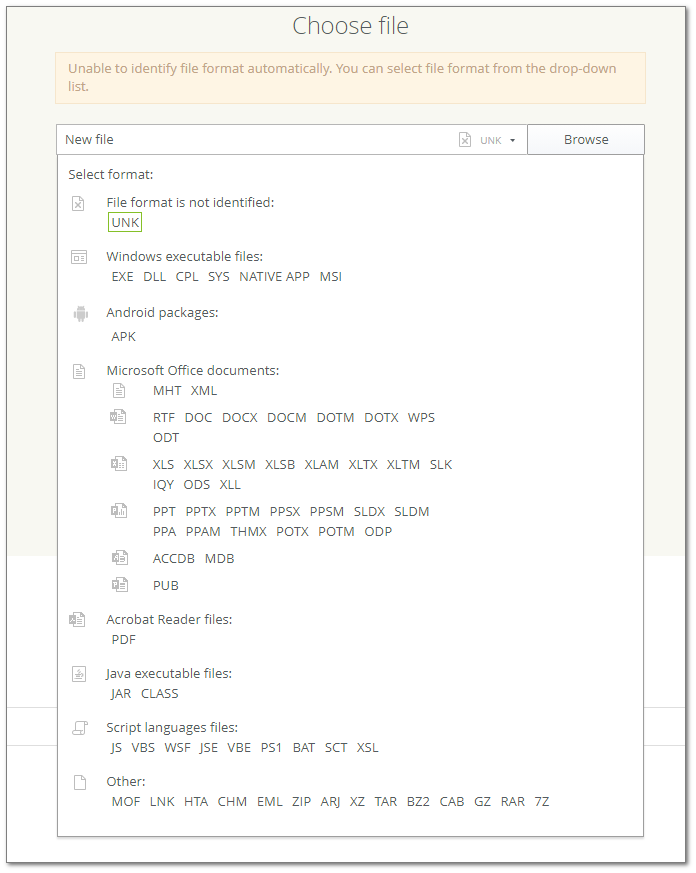
If the file format is not automatically identified (UNK), you will see the Unable to identify file format message. In this case, you can select file format manually.
The MOF, JS, VBS, WSF, JSE, VBE, PS1, and BAT file formats may be identified incorrectly. For these files, you can select format manually. |

Figure 11. Selecting file format manually
To select file format manually, click drop-down arrow and select the corresponding format.
Make sure you have selected a correct file format. Otherwise, analysis results may be incorrect.
2.Choose an operating system or an application version and specify Additional settings if necessary.
You can select multiple OS versions or application versions. In this case multiple virtual machines will be launched. For example, if you select two Windows versions to analyze an executable file (.exe), Dr.Web vxCube will run two VMs.
3.Click Analyze to start checking the file.
You can run files for analysis one by one. Click Back at the top of the page and then choose another file. The ![]() icon displays progress of each analysis.
icon displays progress of each analysis.

Figure 12. Uploading a file
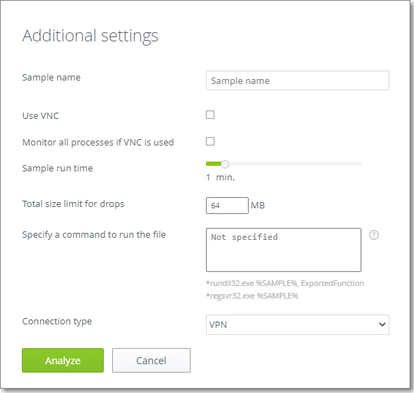
•Use VNC
The availability of this function depends on the current license. You can check the availability in the License window. The use of VNC client is convenient if you choose more than one operating system and you want to influence the process on each of them.
To activate the function, select the Use VNC checkbox. After you start the analysis, new browser tabs open automatically. Tabs are connected to the corresponding virtual machines via VNC client. At the top of each tab a progress bar is displayed. The bar shows the percent complete and current state of the analysis.
Although new tabs open immediately, it can take some time to connect to virtual machines.
If you have not selected this option in Additional settings and have already started the analysis, click Use VNC on the analysis page. VNC client opens in a new tab. |
•Monitor all processes if VNC is used
If the setting is disabled, only the processes that are engaged into malicious activity are included in the report.
•Sample run time
The default sample run time in Dr.Web vxCube is 1 minute. You can reduce or increase the value if it is necessary for the file to be analyzed. For example, you can increase the time, if a file requires more time to show suspicious behavior. To change the run time, use the Sample run time slider, scrolling it to the left or to the right.
•Total size limit for drops
By default the total size for created files is limited to 64 MB. You can increase it to 512 MB.
•Specify a command to run the file
This option allows you to set a specified command for running the file to be analyzed. You can use any application from the standard Windows pack as a command, for example, rundll32.exe, regsvr32.exe, notepad.exe, etc. To use the command, specify it in Specify a command to run the file field.
You can specify a full path to the file using the special %SAMPLE% parameter.
You can use this option if you need to run an executable file by calling an exporting function. For example, rundll32 %SAMPLE%, ExportedFunction.
•Connection type
VPN is used by default. For some connection types, you can specify a proxy server address and authorization parameters. Only TCP connections are proxied. Traffic of the other protocols is transferred via the default VPN server. To redirect UDP traffic, select the Redirect UDP check box.
Figure 13. Additional settings
After specifying additional settings
•Click Analyze to start analyzing the file.
•Click Cancel to reset settings and close the window.
Additional settings are applied to single file. If you close the Additional settings dialog or select another file, you will have to configure the settings again. |
