To use several Dr.Web Servers in an anti-virus network, you should set up connections between these Dr.Web Servers.
It is recommended to make a plan of the anti-virus network structure first. All data flows, connections of the "peer to peer" and "parent-child" types should be indicated. Then, each Dr.Web Server included into the network connections with any "neighboring" Dr.Web Servers ("neighbors" have at least one dataflow between them) should be set up. After that, for each Dr.Web Server included into the network, you should set up connections with "neighboring" Dr.Web Servers ("neighbors" have at least one data flow between them).
If interserver connections between Dr.Web Servers are configured, several new features are added to administrator login area in the main menu.
Example of configuring of a connection between Parent and Child Dr.Web Servers
Values of fields, marked with the * sign, must be obligatory specified. |
1.Make sure that both Dr.Web Servers operate normally.
2.To each of Dr.Web Servers give “meaningful” names, as it will help prevent mistakes while connecting and administering Dr.Web Servers. You can change the names through Dr.Web Security Control Center menu: Administration → Dr.Web Server configuration on the General tab in the Dr.Web Server name field. In this example we name the parent Dr.Web Server MAIN, and the child Dr.Web Server—AUXILIARY.
Names specified at cofiguring will be automatically replaced with the computer names after connecting Dr.Web Servers. |
3.On both Dr.Web Servers, enable the server protocol. To do this, on Dr.Web Security Control Center Administration menu, select Dr.Web Server configuration. On the Modules tab, set the Dr.Web Server protocol flag (see Modules).
4.Restart both Dr.Web Servers.
5.Via Dr.Web Security Control Center of the child Dr.Web Server (AUXILIARY), add the parent Dr.Web Server (MAIN) to the list of neighbor Dr.Web Servers.
To do this, select Anti-virus Network item in the main menu. A window with the hierarchical list of the anti-virus network will open. To add a Dr.Web Server to the list, click ![]() Add a network object →
Add a network object → ![]() Create a neighbor on the toolbar.
Create a neighbor on the toolbar.
A window with connection settings between the current and a new Dr.Web Server will be opened. Specify the following parameters:
•Type of creating neighbor is Parent.
•Name—the name of the parent Dr.Web Server (MAIN).
•Password*—an arbitrary password to access the parent Dr.Web Server.
•Own certificates of Dr.Web Server—the list of SSL certificates of configuring Dr.Web Server. Click ![]() and select the drwcsd-certificate.pem certificate file of the current Dr.Web Server. To add one more certificate, click
and select the drwcsd-certificate.pem certificate file of the current Dr.Web Server. To add one more certificate, click ![]() and add the certificate to a new field.
and add the certificate to a new field.
•Certificates of neighbor Dr.Web Server*—the list of SSL certificates of connecting parent Dr.Web Server. Click ![]() and select the drwcsd-certificate.pem certificate file of the parent Dr.Web Server. To add one more certificate, click
and select the drwcsd-certificate.pem certificate file of the parent Dr.Web Server. To add one more certificate, click ![]() and add the certificate to a new field.
and add the certificate to a new field.
•Address*—the network address of the parent Dr.Web Server and the connection port. Use the following format: <Server_address>:<port>.
You can browse the list of Dr.Web Servers available in the network. To do this:
a)Click the arrow on the right of the Address field.
b)In the opened window, specify networks in the following format: with a hyphen (for example, 10.4.0.1-10.4.0.10), separated by a comma with a whitespace (for example, 10.4.0.1-10.4.0.10, 10.4.0.35-10.4.0.90), with a network prefix (for example, 10.4.0.0/24).
c)Click ![]() to browse the network for available Dr.Web Servers.
to browse the network for available Dr.Web Servers.
d)Select the Dr.Web Server in the list of available Dr.Web Servers. Its address will be set to the Address field to create connection.
•URL of Dr.Web Security Control Center—you can specify the address of a start web page for Dr.Web Security Control Center of the main Dr.Web Server (see Dr.Web Security Control Center).
•In the Connection options drop-down list, specify the type of connection between the linked Dr.Web Servers. If you select any option other than the default (Stay online), the linked servers will connect to each other to transfer data (licenses, updates, events) only at the selected time intervals. The rest of the time, the connection between them will not be sustained.
This setting is available only if the Address field is filled in. For peer-to-peer connection, this setting can be specified on both sides simultaneously (not recommended), but it will only work on the Dr.Web Server that initiated the connection. |
•In the Encryption and Compression drop-down lists, specify parameters of traffic encryption and compression between connecting Dr.Web Servers (see Traffic Encryption and Compression).
•Automatic renewal period of donated licenses—time period for which licenses are donated from the key on this Dr.Web Server. After this period, the donated licenses are automatically renewed for the same period. Automatic renewal is performed till the expiration of the license propagation period. The option is used if the main Dr.Web Server donates licenses to the current Dr.Web Server.
•Interval for preliminary renewal of accepted licenses—the setting is not used in creating a parent Dr.Web Server.
•License synchronization period—interval for synchronizing information about donating licenses between Dr.Web Servers.
•Flags in Licenses, Updates and Events sections are set according to parent-child type of connection and cannot be changed:
▫parent Dr.Web Server sends licenses to child Dr.Web Servers;
▫parent Dr.Web Server sends updates to child Dr.Web Servers;
▫parent Dr.Web Server receives information about events from child Dr.Web Servers.
•The following options are disabled and cannot be changed because the child Dr.Web Server does not receive events from the main Dr.Web Server: Send notifications on events of neighbor Dr.Web Server, Send notifications on events of neighbor Dr.Web Server at threat detection by known hashes and Synchronize data on hardware and software installed on stations via interserver connections.
•In the Update restrictions → Events section, you can configure the schedule of events transmission from the current Dr.Web Server to the parent one (editing of the Update restrictions table is the same as editing schedule table in the Update Restrictions for Workstations section).
Click Save.
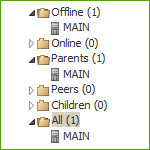
As a result, the Parent Dr.Web Server (MAIN) will be included to the Parents and Offline folders (see the figure below).
6.Open Dr.Web Security Control Center of the parent Dr.Web Server (MAIN) and add the child Dr.Web Server (AUXILIARY) to the list of neighbor Dr.Web Servers.
To do this, select Neighborhood item in the main menu. A window with the hierarchical list of the anti-virus network will open. To add a Dr.Web Server to the list, click ![]() Add a network object →
Add a network object → ![]() Create a neighbor on the toolbar.
Create a neighbor on the toolbar.
A window with connection settings between the current and a new Dr.Web Server will be opened. Specify the following parameters:
•Type of creating neighbor is Child.
•Name—the name of the child Dr.Web Server (AUXILIARY).
•Password*—type the same password as at step 5.
•Own certificates of Dr.Web Server—the list of SSL certificates of configuring Dr.Web Server. Click ![]() and select the drwcsd-certificate.pem certificate file of the current Dr.Web Server. To add one more certificate, click
and select the drwcsd-certificate.pem certificate file of the current Dr.Web Server. To add one more certificate, click ![]() and add the certificate to a new field.
and add the certificate to a new field.
•Certificates of neighbor Dr.Web Server*—the list of SSL certificates of connecting child Dr.Web Server. Click ![]() and select the drwcsd-certificate.pem certificate file of the child Dr.Web Server. To add one more certificate, click
and select the drwcsd-certificate.pem certificate file of the child Dr.Web Server. To add one more certificate, click ![]() and add the certificate to a new field.
and add the certificate to a new field.
•URL of Dr.Web Security Control Center—you can specify the address of a start web page for Dr.Web Security Control Center of the child Dr.Web Server (see Dr.Web Security Control Center).
•In the Encryption and Compression drop-down lists, specify parameters of traffic encryption and compression between connecting Dr.Web Servers (see Traffic Encryption and Compression).
•Automatic renewal period of donated licenses—the setting is not used in creating a connection to a child Dr.Web Server.
•Interval for preliminary renewal of accepted licenses—time interval before the expiration of the licenses automatic renewal period, from which this Dr.Web Server requests the preliminary automatic renewal of these licenses. The option is used if the child Dr.Web Server receives licenses from the current Dr.Web Server.
•License synchronization period—the setting is not used in creating a connection to a child Dr.Web Server.
•Flags in Licenses, Updates and Events sections are set according to parent-child type of connection and cannot be changed:
▫child Dr.Web Server receives licenses from the main Dr.Web Server;
▫child Dr.Web Server receives updates from the main Dr.Web Server;
▫child Dr.Web Server send information about events to the main Dr.Web Server.
•Configure administrator notification:
▫Set the Send notifications on events of neighbor Dr.Web Server flag to send notifications to the administrator about the events received from the configuring child Dr.Web Server. If the flag is cleared, the administrator will receive notifications on events only on the own Dr.Web Server. You can configure sending of certain notifications in the Notification Configuration section.
▫Set the Send notifications on events of neighbor Dr.Web Server at threat detection by known hashes flag to send notifications to the administrator about the events received from the configuring child Dr.Web Server in case of security threat detection by known hashes of threats. If the flag is cleared, the administrator will receive notifications on events only on the own Dr.Web Server. You can configure sending of certain notifications in the Notification Configuration section.
The flag is available only if the usage of bulletins of known threat hashes is licensed. You can check the license in the information on a license key that can be found in the License Manager section, the Allowed lists of hash bulletins parameter (the license in at least one of the license keys used by the Dr.Web Server is sufficient).
▫Set the Synchronize data on hardware and software installed on stations via interserver connections flag to send collected data about hardware, software, and Windows OS updates installed on connected stations to the child Dr.Web Server you are configuring. The data will be sent immediately once the created neighbor Dr.Web Server is connected, and it will be updated should there be any changes in stations' hardware or software in future.
This kind of statistics is collected only from the stations protected by Dr.Web Agent for Windows and only after the corresponding option is enabled in the Dr.Web Server and Dr.Web Agent configuration, as described in the Hardware and Software on Stations under Windows OS section.
Enabling these options may significantly increase the number of received notifications.
When configuring peer Dr.Web Servers, these options are available only if the Receive flag is set in the Events section.
The following notifications are available about events on the neighbor Dr.Web Server: Security threat detected, Report of Preventive protection, Scan error, Scan statistics. The following separate notifications are provided about event on the neighbor Dr.Web Server in case of security threat detection by known hashes of threats: Security threat detected by known hashes of threats, Scan error at threat detection by known hashes of threats, Report of Preventive protection on threat detection by known hashes of threats. |
•In the Update restrictions → Updates section, you can configure the schedule of updates transmission from the current Dr.Web Server to the child one (editing of the Update restrictions table is the same as editing schedule table in the Update Restrictions for Workstations section).
Click Save.
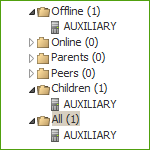
As a result, the child Dr.Web Server (AUXILIARY) will be included to the Children and Offline folders (see the figure below).
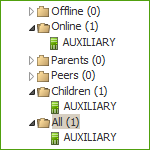
7.Wait until the connection between Dr.Web Servers is established (usually it takes not more than a minute). Press f5 from time to time to update the Dr.Web Server list. After Dr.Web Servers have been connected, the child Dr.Web Server (AUXILIARY) will move from the Offline folder to the Online folder (see the figure below).
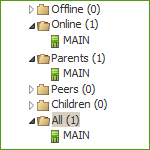
8.Open Dr.Web Security Control Center of the child Dr.Web Server (AUXILIARY) to make sure that the parent Dr.Web Server (MAIN) is connected to the child Dr.Web Server (AUXILIARY) (see the figure below).
You may not connect several Dr.Web Servers with the same pare of parameters: password and the SSL certificate. |
Connection between two Dr.Web Servers can be failed because of the following reasons:
•Network problems.
•Wrong address of the parent Dr.Web Server was set during connection setup.
•Wrong certificates at one of connecting Dr.Web Servers.
•Wrong access password at one of connecting Dr.Web Servers (passwords on connecting Dr.Web Servers do not match).
If you need to establish a new interserver connection between Dr.Web Servers of 10 and 13 versions, perform the following additional actions:
1.When creating a connection, specify the public key of Dr.Web Server v.13 on Dr.Web Server v.10.
2.Generate certificate from the private key of Dr.Web Server v.10 using the drwsign utility (the gencert command) from Dr.Web Server v.13 kit (see the Appendices document, G7.1. Digital keys and certificates generation utility). Specify this certificate when creating a connection on Dr.Web Server v.13.


